Taoffi's blog

prisonniers du temps

Swagger – Browsing REST service definitions

You probably know about Swagger?

Swagger:

OpenAPI Specification (originally known as the Swagger specification) is a specification for machine-readable interface files for describing, producing, consuming, and visualizing RESTful web services.


In a way, Swagger does what soap does for wsdl generated files.

It produces a .json file containing the given service information (data types, operations, parameters… etc.).

I came to know Swagger some days ago on a client site and that was quite useful to document defined services. The UI provided to access those information was quite poor though.

I looked for a more convenient UI for reading the provided .json, but could not find something available. I thus decided to write my own…. Which is the subject of this post.


I first thought it would be quite straightforward: just define objects that match the json structure / parse the json code into my objects… et voilà. I admit I was too optimistic!

The swagger.json schema

Let us first try to understand the structures defined in the generated .json file. I read many articles (some rather obscure!) about that, but through the work craft my understanding got betterJ. Here are the conclusions seen through a .net developer view:

Swagger json file is composed of:


A global (root) service definition, itself composed of (most significant elements for clarity)

  • A Dictionary of service paths:
      • Key = path url
      • Value = Dictionary of operations available at that address. Itself composed of:
        • Key = operation name
        • Value = the operation object. Composed of:
          • General info (name, description, summary… etc.)
          • Operation’s Verb (example: get, post, set, put…)
          • An array of Parameter objects:
            • Description
            • (In) = Where should it be located (example: in the request’s path, argument or body…)
            • Is required (bool flag)
            • Parameter’s data type
          • Operation Responses object = Dictionary of:
            • Key = response code (example: 200, default…)
            • Value = response object:
              • Description
              • Response data type


Remark: you may notice that operation parameters are defined as an array. I think they would better be defined as a dictionary as parameter names should be unique within the same operation.

After the paths node, the schema continues with another interesting node:

    • A Dictionary of service’s data types:
      • Key = data type name
      • Value = Dictionary of data type members:
        • Key = element name
        • Value = a data type object:
          • Type (example: object, string, array… may refer to a defined data type object)
          • Element data type (for objects of type array). Refers to a defined data type.


Here is a screen capture of significant nodes in a sample swagger json file. You may find more samples here.


The objects of the schema can be presented in the following class diagram (note that the ServicePaths dictionary Value is a Dictionary of string, iSvcOperation… I could not find a way to represent this relation in the diagram):


To parse the swagger json data, we will use the now famous NewtonSoft.Json library.

That needs us to add some attributes for the parse process to go right.

Example, in our root class iSvcDefinition:

The service domain names array should parsed, so we tell the library about its model name:

[JsonProperty("tags")]
public iSvcDomain[] ServiceDomainNames { get; set; }


The class contains a property that should not be parsed… so, we tell the parser to ignore it:

[JsonIgnore]
public List<iSvcDomain> ServiceDomainNamesList
{
    get { return ServiceDomainNames == null ? null : ServiceDomainNames.ToList(); }
}

So far, so good… we have objects that correctly represent the swagger json model (complemented by some view model properties in this example!).

We still have a problem: resolving data type references!

Resolving json references

Data types of elements in our swagger json file are specified as references to the related data-type-definition. For example, a Response that returns a ‘Product’ object is serialized as:


"responses": {

"200": {

   "description": "An array of products",

   "schema": { "type": "array",

     "items": { "$ref": "#/definitions/Product" }

   }

},


The full definition of the ‘Product’ data type is defined elsewhere, as:

"Product": {
"properties": {
   "product_id": {
     "type": "string",
     "description": "Unique identifier of the product."
   },
   "description": {
     "type": "string",
     "description": "Description of product."
   },
   "display_name": {
     "type": "string",
     "description": "Display name of product."
   },
   "image": {
     "type": "string",
     "description": "Image URL representing the product."
   }
}
}

So each item of ‘Product’ data type will tell the reference of that type (instead of duplicating definitions).

Resolving json references while parsing needs some craftingJ

In fact, the json parser does not resolve references automatically. That is part 1 of the problem. Part 2 is the fact that to find a referenced item, it should exists. That is: it should have already been parsed. Which requires the data type definitions to be at the beginning of the parsed file. A requirement that is, at least, not realistic.


As always, I searched the web for a sustainable solution. You will find many about this question, including “how to Ignore $ref”… which is the exactly the opposite of what we are looking for in this contextJ

The solution I finally used is:

  • Use the JObject (namespace Newtonsoft.Json.Linq) to navigate as need through the swagger json nodes
  • Start the parse process by:
    • Deserializing the swagger "definitions" node which contains the data types definitions
    • Store data types into a Dictionary: key = type id (its path), Value = the data type object
  • Use a custom resolver (a class which implements the IReferenceResolver (namespace Newtonsoft.Json.Serialization) to assign the related data type object each time its reference is encountered.


Here is the essential code-snippets for resolving references:

// define a dictionary of json JToken for data types
internal static IDictionary<string, JToken> JsonDico { get; set; }

// a dictionary of data types
IDictionary<string, iSvcTypeBase> _types = new Dictionary<string, iSvcTypeBase>();

// create a JObject of the file’s json string
JObject jo = JObject.Parse(jsonString);

// navigate to the definitions node
Var typesRoot = jo.Properties().Where( i => i.Name == "definitions").FirstOrDefault();

// store dictionary of type_path / type_token
if (typesRoot != null)
    JsonDico = typesRoot.Values().ToDictionary( i => { return i.Path; });


Now, we can build our data-type-dictionary using the JTokens:

foreach(var item in JsonDico)
{
   // deserialze the data type of the JToken
   iSvcTypeBase svcType = JsonConvert.DeserializeObject<iSvcTypeBase>(item.Value.First.ToString());

   // add the data type to our dictionary (reformat the the item’s key)
  _types.Add(new KeyValuePair<string, iSvcTypeBase>("#/" + item.Key.Replace(".", "/"), svcType));
}


Our resolver can now return the referenced item to the parser when needed:

public object ResolveReference(object context, string reference)
{
    string                    id = reference;
    iSvcTypeBase      item;
    _types.TryGetValue(id, out item);
    return item;
}


Some screen captures:


You may download the binaries here.

Will post the code later (some cleanup requiredJ)

Back end – front end: Services loose coupling

Most mobile solutions are built and operate in a distributed architecture where services play a prominent role for providing data and applying business logic.

Let us take an example of a hotel reservation mobile app:

  • When the user specifies the desired target city, a back end service would provide the list of available managed/operated hotels at this place.
  • Once he or she specifies the desired stay period, the service would filter the above list to provide those having free rooms for that period.
  • When the user selects a room and applies for the reservation, the service would then register that reservation, proceeds to payment… etc.

It is hardly imaginable for such an app to operate independently from a back end service.


The price of distributed apps

In the previous example, the mobile app presents and manipulates several objects: the place (city/location…), the hotel, the room… etc.

Information about each of these objects is obtained from the service. The structures (metadata) of objects transmitted by the service should obviously match those handled by the mobile app.

In a typical (SOAP) situation, using Visual Studio for instance, your mobile app project would reference the service. Through the service's WSDL file, Visual Studio would generate the code for objects (classes) and operations defined by that referenced service.

If one of service's objects structure changes, you have to relaunch the process to update your app's service reference so that your objects' metadata be in sync with those defined by the service. If you don't do this, your app will simply crash at the first service call involving any unmatched object!

After each single change, deploying the solution's components (service / client app) become also a big hurdle.

In a few solutions, that may be desirable (or required). In most, the hurdle surpasses the benefits. It is hardly sustainable in a large solution. Actually it is not even sustainable when you are the sole developer of both components!

Resorting to use REST instead of SOAP (you may combine both) does not solve the difficulty, as that only changes the serialization format.


Using one single object

Let us imagine a service whose operations return always the same object. That would be quite handy independently of that object's serialization format.

In several large solutions I came to explore during last years, aggregating services responses into an abstract object, say, ServiceResponse was a common design practice. A given service operation response may look like (wsdl):

<element name="Operation1Response">
    <complexType>
        <sequence>
            <element name="Operation1Output"    type="Operation1OutputObject"/>
            <element name="ServiceStatus"     type="ServiceStatus"/>
        </sequence>
    </complexType>
</element>


With this, you know that any service operation you may call will always return a structure containing your expected object along with a service status object.

That approach seems good. Still it is going half way in abstraction, because you still should know the exact structure (metadata) of the expected object. And hence doesn't solve the evolution and deployment hassle: if, for some reason, you change the service's object structure, all your consumers should sync this change before deployment. The deployment of a new service version requires the deployment of a new consumers' versions… big hassle = increased risks.


Back to property bags!

I previously talked about property bags (here and here…).

A short reminder:

  • Objects (as we know till nowJ) are structures composed of: properties, methods and events.
  • An object can be considered as a set of properties (a property bag)
  • An object property can be defined as:
    • A name
    • A data type
    • A Value
  • Property value can be either:
    • A primitive type (value type or whatever we may consider as 'primitive'… string for instance)
    • A composite type: an object itself containing a set of properties (=property bag)


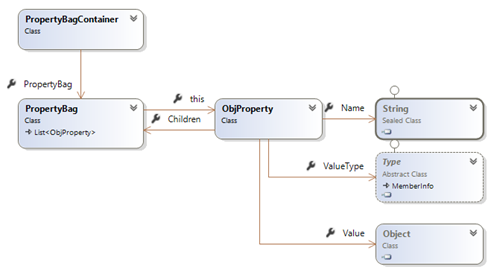
With that simple structure we are able to represent virtually any object in a strongly-typed manner.


Using property bags, we can imagine a unique structure for our service response. Which may look like this (wsdl):

<element name="ServiceResponse">
    <complexType>
        <sequence>
            <element name="OperationOutput"    type="PropertyBag"/>
            <element name="ServiceStatus"     type="PropertyBag"/>
        </sequence>
    </complexType>
</element>


Now, when we call any service operation, we know in advance that it will return an output property bag, accompanied with a status property bag.

Each element of our property bag being strongly typed (specifies its data type), we can easily convert the received bag to the expected object.

That conversion itself can be subject to a set of business rules. But that would be implemented 'once' independently of service or consumer versions and deployment constraints.


This approach doesn't eliminate the need for a unified business model. It enforces its usage.

By creating a loose coupling mechanism between services and consumers it allows more separation of concerns and minimizes evolution and deployment risks.

Exercise: service side code sample

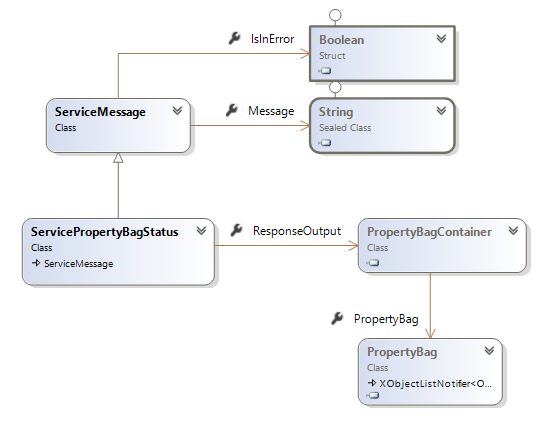
Let us define service response as:

[DataContract(Namespace = "")]
public partial class ServicePropertyBagStatus : ServiceMessage

{
    PropertyBagContainer    _responseOutpput;

    [DataMember]

    public PropertyBagContainer ResponseOutput

    {

        get { return _responseOutpput; }

        set { _responseOutpput = value; }

    }
    …
    …

Our response structure would then look like (wsdl):

<complexType name="ServicePropertyBagStatus">
    <complexContent mixed="false">
        <extension base="ServiceMessage">
            <sequence>
                <element name="ResponseOutput" type="PropertyBagContainer"/>
            </sequence>
        </extension>
    </complexContent>
</complexType>


Sample code of a service operation (for reading a customer data) may look like this:

[OperationContract]
public ServicePropertyBagStatus GetCustomer(int customerId)

{
    return SvcUtilities.LoadCustomer(customerId);

}

Our service utilities module method LoadCustomer:

public static ServicePropertyBagStatus LoadCustomer(int customeId)
{
    ServicePropertyBagStatus    status    = new ServicePropertyBagStatus();

    if(customerId == 0)
    {
        status.SetErrorMessage("No value provided customerId");
        return status;
    }

    // load the customer's info from database server

    Customer        customer    = Customer.LoadDbUser(customerId);

    // extract this object's data contract into a property bag container

    status.ResponseOutput = ExtractPropertyBagContainer(customer.GetType(),customer);

    // return the service response status

    return status;
}

Extract the object's property bag:

internal static PropertyBagContainer ExtractPropertyBagContainer(Type type, object obj)
{
    // get soap xml of the object's data contract

    DataContractSerializer serializer = new DataContractSerializer(type);
    MemoryStream stream = new MemoryStream();

    serializer.WriteObject(stream, obj);

    // parse the soap xml into a property bag container
    PropertyBagContainer container = PropertyBagContainer.ParseXml(stream, true, null);

    stream.Close();
    return container;

}

Some Property bag container helper methods:

public class PropertyBagContainer
{
    protected PropertyBag _bag;


    // parse an object into a property bag container
    public static PropertyBagContainer ParseObject(object obj, ObjProperty parent);

    // parse xml stream into a property bag container
    public static PropertyBagContainer ParseXml(Stream stream, bool parseSiblings, ObjProperty parent);

    // parse xml node tree into a property bag container
    public static PropertyBagContainer ParseXml(XElement xnode, bool parseSiblings, ObjProperty parent);
}

Client side code sample

Our service operations will now return a Property Bag Container containing the expected object's property bag. A helper static method of PropertyBag (AssignObjectProperties) allows us to assign its content to a specific object:

public static bool AssignObjectProperties(object targetObject, PropertyBag bag)


We can thus write:

public bool ParsePropertyBag(PropertyBag bag)
{

return PropertyBag.AssignObjectProperties(this, bag);

}


Assigning property bag contents to an object is done by assigning values of the bag items to object's properties having the same name and data type. Extra logic can be introduced here according to your business requirements (for instance: checking object integrity through specific attributes).


Now, on the service consumer application, assume we have a service that is referenced as CustomerService. We may call the service's LoadCustomer operation like in the following code:

public bool LoadServiceCustomer(int customerId)
{
    CustomerService proxy = new CustomerService();
    var status = proxy.
LoadCustomer(customerId);


    // we may check the service status for errors here 
     ….

    // assign received properties to this object
    return this.ParsePropertyBag(status.ResponseOutput.PropertyBag);
}

Client side with Json

The process is the same in a REST configuration (You may see some details about WCF REST services here) as you actually will always receive a ServicePropertyBagStatus object independently of the transmission format (xml / json… etc.). Parsing the received response into a property bag container can be done using components like the .Net NewtonSoft.Json:

HttpWebRequest request = (HttpWebRequest) WebRequest.Create(url);
string str = GetResponseString(request);
ServicePropertyBagStatus  response = JsonConvert.DeserializeObject<ServicePropertyBagStatus>(str);
PropertyBagContainer container    = response.ResponseOutput;

You can download the property bag binaries (std + portable) here.

Xamarin forms maps – let’s talk renderers: 2. Droid

Let us go back to Xamarin Forms Maps!

In a previous post, I exposed a WinPhone custom renderer for maps.

The object of our renderer is to:

  • Display custom pushpin (marker) icon
  • Display a custom info window for each place (pushpin / marker)


The custom renderer

Our Droid custom renderer will derive from MapRenderer and, for reasons we will see later, will implement the GoogleMap.IInfoWindowAdapter:


[assembly: ExportRenderer (typeof(iMaps.iCustomMap),
                                    typeof(iMaps.Droid.iCustomMapViewRenderer))]


namespace iMaps.Droid
{
    public class iCustomMapViewRenderer : MapRenderer, GoogleMap.IInfoWindowAdapter


Customizing the marker icon

In android, markers can relatively easily be customized to show a custom icon. Here, we use the custom icon of our Custom pin


iCustomPin    customPin    = pin.BindingContext as iCustomPin;
string    resourceName    = System.IO.Path.GetFileNameWithoutExtension(customPin.IconResource);
int        resourceId        = Context.Resources.GetIdentifier(resourceName, "drawable",
                                        Context.PackageName);

bmp = BitmapDescriptorFactory.FromResource(resourceId);
marker.SetIcon(bmp);

Setting markers and their custom icons will be done when the map is to be rendered (i.e. in the OnElementPropertyChanged override of our renderer). That is best done once when the map will be ready.

To know when the map is ready, we must implement the IOnMapReadyCallback Interface which defines one only method: void OnMapReady(GoogleMap googleMap). With this in place, google maps will call us when the map is ready.

Our renderer will thus now look like this:

public class iCustomMapViewRenderer : MapRenderer, GoogleMap.IInfoWindowAdapter,
IOnMapReadyCallback

Our OnMapReady method will set variables required for drawing the map.


GoogleMap            _map;

public void OnMapReady (GoogleMap googleMap)
{
    _map        = googleMap;
    _map.InfoWindowClick    += Map_InfoWindowClick;

    // required if you wish to handle info window and its content
    _map.SetInfoWindowAdapter (this);
}

OnElementPropertyChanged of our renderer will proceed to putting the pins on the map:


bool                _isDrawingDone;

protected override void OnElementPropertyChanged (object sender,

                                        PropertyChangedEventArgs e)
{
    base.OnElementPropertyChanged (sender, e);

    if(_map == null || _isDrawingDone || e.PropertyName != "VisibleRegion")
        return;

    _map.Clear ();
    _map.MarkerClick            += HandleMarkerClick;
    _map.InfoWindowClick    += Map_InfoWindowClick;

    foreach (var pin in _mapPins)
    {
        var            marker        = new MarkerOptions ();
        iCustomPin    customPin    = pin.BindingContext as iCustomPin;

        marker.SetPosition (new LatLng (pin.Position.Latitude, pin.Position.Longitude));
        marker.SetTitle (pin.Label);

        if(! string.IsNullOrEmpty(pin.Address))
            marker.SetSnippet(pin.Address);

        BitmapDescriptor    bmp        = null;

        string    resourceName    =
                    System.IO.Path.GetFileNameWithoutExtension(customPin.IconResource);
        int        resourceId        = Context.Resources.GetIdentifier(resourceName,
                                                "drawable", Context.PackageName);

        bmp = BitmapDescriptorFactory.FromResource(resourceId);
        marker.SetIcon(bmp);

        _map.AddMarker(marker);
    }

    _isDrawingDone = true;
}


Customizing the popup info window

Customizing the popup info window is a different kettle of fish ('une autre paire de manche' en françaisJ)

Why?

Simply because the google maps documentation says that the info window is a View, but specify this interesting note:

Note: The info window that is drawn is not a live view. The view is rendered as an image (using View.draw(Canvas)) at the time it is returned. This means that any subsequent changes to the view will not be reflected by the info window on the map.


To update the info window later (for example, after an image has loaded), call showInfoWindow(). Furthermore, the info window will not respect any of the interactivity typical for a normal view such as touch or gesture events. However you can listen to a generic click event on the whole info window as described in the section below.


So, it IS a View… but NOT REALLYJ

Let us be more specific: it is NOT a view. It is actually a Bitmap.


Anyway, to be able to customize the info window, our renderer must implement the GoogleMap.IInfoWindowAdapter Interface. Which defines two methods:

  • View GetInfoContents(Marker marker);
  • View GetInfoWindow(Marker marker);


GetInfoWindow: returns the entire popup window. If it returns null, then it is GetInfoContents which will define the contents of the default info window frame of the marker popup.

As the 'pseudo-view' returned in both cases are not really views but bitmaps, our task is to compose a view of the pin information before transforming this to a bitmap.


In our current exercise, we will return the window content. Therefor our GetInfoWindow() will return null.

public Android.Views.View GetInfoWindow(Marker marker)
{
    return null;
}

From Xamarin Forms Xaml à to Native View à to Bitmap: dangerous tour!

As I am not a 'droid boy', I decided to create a Xamarin Forms control (ContentView) and use this in the custom renderer. You may of course decide differently to use a Droid axml control. In both ways, we will have to convert that control's content into Bitmap.

Here is my ContentView Xaml (assumed to be bound to an iCustomPin):


<StackLayout Spacing="4" >
    <Image Source="{Binding ImageFile}"
            WidthRequest="84" HeightRequest="84" HorizontalOptions="StartAndExpand" />
    <Label FontAttributes="Bold" Text="{Binding Name}" />
    <BoxView HeightRequest="1" BackgroundColor="Gray"
                HorizontalOptions="FillAndExpand" VerticalOptions="Start" />
    <Label x:Name="labelText" Text="{Binding MapPinText}" LineBreakMode="WordWrap" />
</StackLayout>

Our GetInfoContents method will have to:

  • Identify the clicked custom pin
  • Set the binding context of the above ContentView to that pin
  • Transform that XF control to a native Droid ViewGroup
  • Transform the resulting droid native ViewGroup into a bitmap to be returned to Google maps.

The following code illustrates these steps:


iMapPinInfoCtrl        xamInfoPanel    = new iMapPinInfoCtrl();

public Android.Views.View GetInfoContents(Marker marker)
{
    iCustomMap     myMap         = this.Element as iCustomMap;
    iCustomPin     customPin     = myMap.GetPinAtPosition(
                new Position(marker.Position.Latitude, marker.Position.Longitude));
    double            infoWidth        = this.Control.Width * 0.70,
                        infoHeight        = 380.0 / 2.8;
    SamplePlace    place                = customPin.DataObject as SamplePlace;

    xamInfoPanel.BindingContext = place;

    // get the droid native control
    ViewGroup    viewGrp        = DroidXFUtilities.ConvertFormsToNative(
                xamInfoPanel.Content, new Rectangle(0, 0, infoWidth, infoHeight));

    // transform the native control into a bitmap
    Bitmap        bmp            = DroidXFUtilities.ViewGroupToBitmap(viewGrp,
                                                    this.Context,
                                                    (int)infoWidth, (int)infoHeight,
                                                    true);

    _pinImage.SetImageBitmap(bmp);

    return _pinImage;
}

To Native ViewGroup

An interesting post from Michael Ridland helped solve this task!

Get the native droid ViewGroup of XF View code snippet:


public static ViewGroup ConvertFormsToNative(Xamarin.Forms.View view,
                                            Rectangle size)
{
    var        vRenderer        = Platform.CreateRenderer(view);
    var        viewGroup        = vRenderer.ViewGroup;

    vRenderer.Tracker.UpdateLayout();

    var        layoutParams    = new ViewGroup.LayoutParams((int)size.Width, (int)size.Height);

    viewGroup.LayoutParameters        = layoutParams;
    viewGroup.DrawingCacheEnabled    = true;
    view.Layout(size);
    viewGroup.Layout(0, 0, (int)size.Width, (int)size.Height);
    return viewGroup;
}

Native ViewGroup to Droid.Graphics.Bitmap

I must first confess that this task was hard for meJ.

I read some articles about the subject, of which this interesting one "Converting Views to Bitmap Images in Android"… but, in the practical exercise, couldn't grasp how to get precise measures of rendered elements!

The task steps is to:

  • Create a Linear Layout
  • Create a Bitmap and put it into a Canvas
  • Loop through the ViewGroup's elements (Views) and add them to the Layout
  • Draw the Layout into the Canvas
  • Return the Bitmap (which will contain the rendered layout's views)

Getting the precise measures of views is not simple. Notably for images and labels with text wrap attribute.

Here is a simplified snippet of my code (assuming that no images are part of the ViewGroup's elements). The solution's source code has more details about handling images. But you should be able to do much better if you are an android expertJ


public static Android.Graphics.Bitmap ViewGroupToBitmap(ViewGroup viewGroup,
                                             Context context,
                                             int width, int height)
{
    int        viewCount = viewGroup == null ? 0 : viewGroup.ChildCount;
    Android.Widget.LinearLayout layout        = new Android.Widget.LinearLayout(context);
    Bitmap    bmpLayout    = Bitmap.CreateBitmap(width, height, Bitmap.Config.Argb8888);
    Android.Graphics.Color    white        = Android.Graphics.Color.Argb(0xff, 0xff, 0xff, 0xff);

    layout.DrawingCacheEnabled            = true;
    layout.SetBackgroundColor(white);

    Canvas    canvas    = new Canvas(bmpLayout);

    // add the sub views contained in this view group
    for (int ndx = 0; ndx < viewCount; ndx++)
    {
        Android.Views.View view = viewGroup.GetChildAt(0);

        int            wid            = Math.Max(0, view.MeasuredWidth),
                        hi                = Math.Max(0, view.MeasuredHeight);

        viewGroup.RemoveView(view);
        layout.AddView(view, wid, hi);
    }

    layout.Draw(canvas);

    return bmpLayout;
}


The result looks like this:


You may Download the code Here

XML – the ASCII of our era

At the dawn of XML, Tim Bray once said "XML is the ASCII of the future"… which is now clearly the case!


To ease reading and handling XML files, I started writing an XML browser last year. The 'Open file' menu of the app first proposed '*.xml' file extension.

As you may imagine, quite quickly that expanded to so many other file extensions: *.xml; *.xaml; *.xsd; *.wsdl; *.csproj; *.vbproj; *.dwproj; *.rptproj; *.config; *.dim; *.ds?; *.cube; *.partitions; *.manifest; *.database; *.rsd; *.rds; *.rdl the list is actually endless!

Why write a XML browser / editor?

Most XML tools I found look more like good (some excellent) editors / syntax visualizers. What I needed more was to have a logical image of the tree structure of an XML file: which node is parent of which…

Xml Note Pad did part of this but was more text-editor-oriented than logical structure visualizer. Its most recent version also dates 2007… time is running!

Of course there is not one sole way to handle such question. Visualizing the tree structure is one aspect. Editors with syntax highlighting, nodes expand/collapse… are still of course very useful.

Let us take a simple user control xaml file with the code similar to this:


Viewing the above code's node tree helps better understand its structure:


How can we handle XML tree presentation?

XML code is composed of some foundation elements:

  • The element name (the xml tag… which is part of a namespace).
  • The element property (or properties). Which may be either:
    • A value (string / primitive type)
    • A composite element:
      • A set of attributes
      • And / or a set of child elements


A simple example:

<person gender="female">

Element = person, gender = an attribute whose value is female

  <firstname>Anna</firstname>

firstname (property of person) whose value is Anna

  <lastname>Smith</lastname>

lastname (property of person) whose value is Smith

</person>

End of the composite element person


The above code can also be written like this (1st attribute shifted to a property level):

<person>
  <gender>female</gender>
  <firstname>Anna</firstname>
  <lastname>Smith</lastname>
</person>


You may look here for more information about the XML model.


At our .net level, we have objects defined in System.Xml.Linq that allow us to (more or less easily) explore, traverse and query a XML tree. Some of these:

  • XDocument (derives from à XContainer à XNode à XObject)
  • XElement (derives from à XContainer à XNode à XObject)


These xml-specialized objects are indispensable to safely communicate with the xml model, but are not good candidates for a view to represent the xml tree.

In some way, in a MMVM pattern, they represent the model (and business logic). We need an intermediate component that can be integrated into a view model and a view.

Property Bags to the rescue

I briefly mentioned property bags in a previous post about MSBuild browser. Let me elaborate a little more about this.

A property bag is a set of abstracted properties. Where a property is presented as:

  • A name
  • A data type
  • A value

And where the property 'value' can be either:

  • An object or primitive value (string for instance)
  • Or a set of properties (i.e. a property bag)


This model proved quite useful in many contexts. You may for instance transform any object into a property bag representing its properties (in a strongly-typed form). This can be quite useful in situations where loose coupling is a concern (applications ßà services for instance). I will talk about this in details later in a following post.


For our current question about presenting xml trees, property bag model seems to be in sync with the xml model:

Xml element:

name / value / attributes / sub-elements (children)

Property bag element:

name / value / sub-elements (children)


To clarify by the practice, here is an example for parsing a XElement attributes into a property bag:


static PropertyBag ParseXmlNodeAttributes(XElement xnode, ObjProperty parent)
{
    // create a property bag as a child of the parent property
    PropertyBag targetBag    = new PropertyBag(parent);

    // add the xml element attributes to the bag
    foreach (XAttribute attrib in xnode.Attributes())
    {
        targetBag.Add(attrib.Name.LocalName, attrib.Value);
    }

    return targetBag;
}


Parsing a XElement can be done in a few steps:

  • Create an ObjProperty with name = xml element's name
  • If the element's value is composite (attributes and/or child items): add element's attributes and children to the ObjProperty Children
  • Otherwise set the ObjProperty value to the element's value


The following code illustrates this (simplified version of the code for clarity)


public static PropertyBag ParseXml(XElement xnode, ObjProperty parent)
{
    string            propertyName    = xnode.Name.LocalName;
    PropertyBag    bagObject        = new PropertyBag(propertyName);
    ObjProperty    property            = new ObjProperty(propertyName);
    PropertyBag    bagAttributes    = new PropertyBag();
    PropertyBag    bagSubItems    = new PropertyBag();

    // get the XEelement attributes' bag
    bagAttributes    = ParseXmlNodeAttributes(xnode, property);

    // add attributes (if any) to Children
    if (bagAttributes.Count > 0)
    {
        bagObject.AddRange(bagAttributes);
    }

    // add sub elements if any
    var        subNodes        = xnode.Descendants();

    foreach(var element in subNodes)
    {
        string            nodeName        = element.Name.LocalName;
        PropertyBag    elementBag    = ParseXml(element, property);

        ExtractPropertyValue(bagSubItems, elementBag, nodeName, property);
    }

    bagObject.AddRange(bagSubItems);

    return bagObject;
}


The Xml Property Bags' view model

Presenting a property bag in a view requires some additional properties that are specific for a view. For instance, an 'Expanded' property for a tree node, a 'Selected' property for an item, as well as useful commands and search/filter features… etc.

Our property bag view model will embed the bag item and adds such properties.


The Xml Property Bags' Views

We need to present our xml property bags in either a tree view or a grid view.

As I said earlier, a property bag item contains either a primitive value (which may be presented as a string) or a set of child items.

In a WPF tree view that can be presented like this (code simplified for clarity):

    <!-- import view model namespace -->
    xmlns:vm="clr-namespace:iSoapExplorer2015.viewmodel"


<TreeView x:Name="treeView1" ItemsSource="{Binding Containers}">

    <TreeView.ItemTemplate>
        <!-- hierarchial data template for containers items -->
        <HierarchicalDataTemplate
                    DataType="{x:Type vm:PropertyBagItemVM}"
                    ItemsSource="{Binding Containers}" > <!-- Containers = property bags -->
            <StackPanel Orientation="Horizontal">
                <!—note: 'Node' is the property bag item -->
                <TextBlock Text="{Binding Node.Name}"/>    
            </StackPanel>
        </HierarchicalDataTemplate>

    </TreeView.ItemTemplate>


That results is a view that looks like the one at the beginning of this post (with an image added to the tree view item template)

A data grid view may look like this (again: code simplified for clarity):


<DataGrid ItemsSource="{Binding }">
    <DataGrid.Columns>
        <DataGridTextColumn Header="Property" Binding="{Binding Node.Name}" />
        <DataGridTemplateColumn Header="Value" Binding="{Node.ValueAsString}" />
    </DataGrid.Columns>
</DataGrid>

For a xaml Stack Panel snippet element, our view may look like this (an image column added to the above simplified code):


With some more work, you may implement more useful features and visual effects.

The current version offers: Xml nodes Tree and Grid views, Search nodes (by name and / or value), get the selected node XML, Export the entire tree to an xml file… etc.


I stopped short from editing the nodes (names / values)… but you may add such feature (before I do… probably in a near futureJ)


Here is the current version's binaries.

Have fun adding new features to the source code if you would like to.