Taoffi's blog

prisonniers du temps

OneNote Explorer

In January 2004, Chris Pratley wrote about "OneNote genesis". His article ended by this sentence: "…I can see how this might become addictive."

Yes, as many people who know OneNote often use the word, "addictive" is a correct adjective for OneNote.

What makes it addictive is probably the fact that it is a medium for 'not-yet-documented' ideas. In the same time, it offers a good and simple hierarchical storage that helps organize those ideas for future documentation.

One great thing is that OneNote exposes its objects and methods for developers through an API for extending its features. There are many feature-rich add-ins for OneNote, which can fit your needs in several areas.

In my case, I needed a sort of 'periscope' to explore my own notes. A tool that can let me see my notes ordered by creation or last update dates, mark and retrieve some of them as favorite items, have a quick preview of a note, locate the section's file folder, search notes' titles and/or content… etc.

Using the API, I could write a 'OneNote Explorer'… a tool I started writing in 2010, enriching it with new features from time to time.

OneNote API

OneNote API is xml-based. A set of methods in the Application Interface let you get information about opened notebooks and their structures (section groups, sections, pages… etc.) in xml format.
Understanding OneNote xsd schema is thus essential.

OneNote XSD overview: main objects

 onenote xsd

  • A Notebook is (similar to file folder) a sequence of:
    • Sections
    • And/or Section groups. Where a Section group itself is a sequence of:
      • Section groups
      • And/or Sections. Where a Section is a sequence of:
        • Pages.

OneNote Page definition

onenote page xsd

  • Apart from its attributes (see xsd elements above), a Page is a set of either:
    • An Image
    • A Drawing
    • A File
    • A Media
    • An Outline (similar to html main <div>) which is (somewhat simplified here) is a sequence of:
      • OE children (OneNote Elements). Each OE can be either:
        • An Image
        • A Table
        • Drawing
        • Or a sequence of:
          • T (text range)

Application overview

Application view model classes:

 application main classes


A static class (OneNoteHelpers) exposes several methods to communicate with OneNote API and create / update the view model objects as required:

 code map 1

Summary of methods exposed by the helper static class:

 onenote helpers

Features

  • View selected section pages. Search titles, sort the datagrid, add page to favorites, open page in OneNote, html preview

feature 1

  • View all notebook pages. Search titles, sort the datagrid, add page to favorites, open page in OneNote, html preview

feature 2

  • Search selected notebooks

feature 3

  • Manage favorites: delete, preview, open in OneNote…

feature 4

Page preview note

The application's Preview button displays the html content of the selected page. As OneNote API can return the page xml content, an xslt style sheet (with templates per each element type of the xsd definition) allows a simple and quick preview.

sample page 

The simple page's xml tree

sample page's xsd

The page xml code

 
<?xml version="1.0" encoding="utf-8"?>
<one:Page xmlns:one="http://schemas.microsoft.com/office/onenote/2013/onenote"
         ID="{138E40BA-13BB-4D24-A78C-D92E4E23D574}{1}{E1949424590587215702781963951539196781170461}"
         name="Sample page title" dateTime="2018-04-20T18:53:38.000Z"
         lastModifiedTime="2018-04-20T19:00:30.000Z"
         pageLevel="1"
         isCurrentlyViewed="true"
         selected="partial"
         lang="en-US">
<!-- ***************** quick styles ***************************** -->
<one:QuickStyleDef index="0"
                     name="PageTitle"
                     fontColor="automatic"
                     highlightColor="automatic"
                     font="Calibri Light"
                     fontSize="20.0" spaceBefore="0.0" spaceAfter="0.0" />
 
<one:QuickStyleDef index="1"
                     name="p"
                     fontColor="automatic"
                     highlightColor="automatic"
                     font="Calibri"
                     fontSize="12.0"
                     spaceBefore="0.0" spaceAfter="0.0" />
    
<!-- ********** page settings ********** -->
<one:PageSettings RTL="false" color="automatic">
<one:PageSize>
<one:Automatic />
</one:PageSize>
<one:RuleLines visible="false" />
</one:PageSettings>
    
<!-- ********** title ********** -->
<one:Title selected="partial" lang="en-US">
<one:OE author="taoffi" authorInitials="T.N."
            lastModifiedBy="taoffi"
            lastModifiedByInitials="T.N."
            creationTime="2018-04-20T18:53:46.000Z"
            lastModifiedTime="2018-04-20T18:53:46.000Z"
            objectID="{9DB0692F-3758-49BC-8E87-F040F40599C2}{15}{B0}"
            alignment="left"
            quickStyleIndex="0" selected="partial">
<one:T><![CDATA[Sample page title]]></one:T>
<one:T selected="all"><![CDATA[]]></one:T>
</one:OE>
</one:Title>
    
<!-- ********** page content (main <div>) ********** -->
<one:Outline author="taoffi"
             authorInitials="T.N."
             lastModifiedBy="taoffi"
             lastModifiedByInitials="T.N."
             lastModifiedTime="2018-04-20T19:00:28.000Z"
             objectID="{9DB0692F-3758-49BC-8E87-F040F40599C2}{30}{B0}">
<one:Position x="36.0" y="86.4000015258789" z="0" />
<one:Size width="123.9317169189453" height="14.64842319488525" />
<one:OEChildren>
        <!-- ********** paragra^ph ********** -->
<one:OE creationTime="2018-04-20T18:53:47.000Z"
             lastModifiedTime="2018-04-20T18:53:52.000Z"
             objectID="{9DB0692F-3758-49BC-8E87-F040F40599C2}{33}{B0}"
             alignment="left"
             quickStyleIndex="1">
         <!-- ********** paragraph text ********** -->
<one:T><![CDATA[Sample page text]]></one:T>
</one:OE>
</one:OEChildren>
</one:Outline>
</one:Page>


OneNote 2010 vs. 2013 and above

There are some compatibility issues between OneNote API for 2010 version and 2013 and above. More changes have been introduced in 365 version.

The downloadable binaries here are for OneNote 2013 and 2016 desktop.

You may download the binaries Here!

Xamarin: the missing Description attribute

If you are a Windows C# programmer, you may know about the DescriptionAttribute and its help in describing an object, a property, method or any other member of a class in a human way.

You may also use [Description], to associate a Label to a property and later use it in the UI.

As Xamarin.Forms does not (yet) offer this simple useful attribute, I decided to write one.

The basic code

Our Description attribute class is quite simple:

[AttributeUsage(validOn: AttributeTargets.All, AllowMultiple = false, Inherited = false)]
public class DescriptionAttribute : Attribute
{
    public string _description;

    public DescriptionAttribute(string description)
    {
         _description = description;
    }

    public string Description
    {
        get { return _description; }
        set { _description = value; }
    }
} 


With this in place, we can now write things like:

[Description("This is my object")]
public class MyClass
{
    [Description("This is my constructor")]
    public MyClass()
    {
    }

    [Description("My property")]
    public string Property1
    {
     … 
    }


Reading back the descriptions

Well, but for this to be useful, we must do something to get back these descriptions when needed.

First: how to read the descriptions assigned to objects and members?

Some extension helpers can simplify this work (remember: we are in portable (PCL) library, and also using System.Reflection):

public static string Description(this Type objectType)
{
    if(objectType == null)
        return null;

    TypeInfo typeInfo = objectType.GetTypeInfo();
    var attrib = typeInfo.GetCustomAttribute<DescriptionAttribute>();
    return attrib == null ? null : attrib.Description;
}


To get the description of MyClass, The above extension method now allows us to write:

string    classDescription    = typeof(MyClass).Description();


Another method may even make that simpler: get the description of an object's instance of a given class:

public static string Description(this object obj)
{
    if(obj == null)
        return null;

    return obj.GetType().Description();
}


This allows us to write: myObject.Description(); to get the description of myObject's class.

Reading back the description of class members

Reading a given member (property / method…) description, we have to look into the MemberInfo object of that given member to find the Description attribute:


public static string MemberDescription(this MemberInfo member)
{
    if(member == null)
        return null;

    var attrib = member.GetCustomAttribute<DescriptionAttribute>();
    return attrib == null ? null : attrib.Description;
}


How to get a member info? Not quite handy!...

Let us simplify a little more. The following code (though it may be somehow difficult to read… see System.Linq.Expressions) will allow a much easier syntax.


public static string PropertyDescription<TMember>( Expression<Func<TMember>> memberExpression)
{
    if (memberExpression == null)
        return null;

    var expression = memberExpression.Body as MemberExpression;
    var member = expression == null ? null : expression.Member;

    if (member == null)
        return null;

    return member.MemberDescription();
}


The above method analyses its Expression parameter to extract the MemberInfo for us and calls the original method to extract the description of the member.

To use this method to extract the description of 'Property1' , we can write:

string propertyLabel = PropertyDescription(()=> Property1);


What about Enums?

As you know, we often give short (occasionally cryptic!) names for enum members. Displaying these names in a clear human-readable manner to the user for selecting a value is usually a challenge.

The Description attribute can help us assign these labels. Reading them back is somehow another challenge. The reason is that enum members are fields (in contrast to member properties and methods we saw before)

Actually, with enums, we have two challenges: find the description of each element, but also be able to retrieve the value of a selected description.

For the first challenge, find the description of an element, let us try this extension:


public static string EnumDescription(this Enum value)
{
    if(value == null)
        return null;

    var type = value.GetType();
    TypeInfo typeInfo = type.GetTypeInfo();
    string typeName = Enum.GetName(type, value);

    if (string.IsNullOrEmpty(typeName))
        return null;

    var field = typeInfo.DeclaredFields.FirstOrDefault(f => f.Name == typeName);

    if(field == null)
        return typeName;

    var attrib = field.GetCustomAttribute<DescriptionAttribute>();
    return attrib == null ? typeName : attrib.Description;
}


Sample usage:


public enum Flowers
{
    [Description("African lily")]
    Agapanthus,

    [Description("Alpine thistle")]
    Eryngium,

    [Description("Amazon lily")]
    Eucharis,
};


string africanLilly = Flowers.Agapanthus.EnumDescription(); //"African lily"
string alpineThistle = Flowers.Eryngium.EnumDescription(); //"Alpine thistle"


Find the enum value by its description

The second task is to retrieve the enum value by its description. For instance when the user selects one of the displayed descriptions.


public static int EnumValue(this Enum value, string selectedOption)
{
    var values = Enum.GetValues(value.GetType());

    foreach(Enum v in values)
    {
        string description = v.EnumDescription();

        if(description == selectedOption)
            return (int) v;
    }

    return 0; // arbitrary default value
}


Now we can write:


Flowers africanLilly = Flowers.EnumValue("African lily");    // Agapanthus
Flowers amazonLilly = Flowers.EnumValue("Amazon lily");    // Eucharis


Back to earth – Xamarin.Forms Cuvée 2017

After some months spent on other project types, so glad to find back Xamarin.Forms and to see how it evolved (matured) with the integration in Visual Studio 2017.

The new Xamarin.Forms project template is awesome and pedagogic. You can start building an entire professional solution around the basic objects delivered within that template!

This 2017 spring (well: it is autumn elsewhere!) other interesting projects also blossomed. Don't miss Grial 2.0 of UXDivers. A great ergonomic framework for Xamarin.Forms.

Those guys @UXDivers are unique! (Will talk about this later)

The new Xamarin.Forms template base objects

Inside the main portable project, you will find the 'Helpers' folder containing some interesting foundation objects, of which, the ObservableObject class.

ObservableObject is the base class of another delivered sample object 'BaseDataObject' of which derives the 'Item' object… another delivered sample object.


The relationship between those objects are shown in the following class diagram:


That looks to be a great and mature foundation. Deriving your objects from this simple architecture would allow you, among other benefits, to have a reliable property change notification mechanism (See my last year's post about this question)


Great… But!

As often among our developer community, we may agree on an architectural pattern and disagree on parts of its implementation.

In the new Xamarin implementation, a class calls its parent to set a property value. The parent then sets the new value and notifies the property change.


Here is the base class's (ObservableObject) code to set a property value:


protected bool SetProperty<T>(ref T backingStore, T value,
             [CallerMemberName]string propertyName = "",
             Action onChanged = null)
{
     if (EqualityComparer<T>.Default.Equals(backingStore, value))
         return false;

      backingStore = value;
     onChanged?.Invoke();
     OnPropertyChanged(propertyName);
     return true;
 }


A derived class can then use this:


string description = string.Empty;

public string Description
{
     get { return description; }
     set { SetProperty(ref description, value); }
}


In the above example, the property change notification is executed using the caller name (thanks to CompilerService.CallerMemberName attribute) unless the name is explicitly specified.


Note: msdn documentation

An Empty value or null for the propertyName parameter indicates that all of the properties have changed.


In so many case, a property change may require notifying the change of one or more of other object properties. A simple example would be: when you change the 'Birth date' of a person object, which requires notifying the change of his or her Age property as well.

In fact, an object's property value is, in most cases, linked to business rules and is better handled at the object's level. The property change notification, as its name suggests, is related to notifying external objects who may be interested by the value change of that property.

Summarizing this need by a SET mechanism can be good but does not seem to be an all-purpose solution.

We still need to complement this with the 'old' notification mechanism (based on Expressions) exposed in the pattern of the abovementioned post (which, itself, derives from other community knowledge as I mentioned!)


[This post corrects and clarifies points mentioned in a previous post]

Comparable sets

When we manipulate various collections of items, you often need to compare them.

Functionally speaking, comparing two collections (set1 and set2), in its simplest form, may mean:

  • Get the collection of items in set1 that are not in set2 (or vice versa)
  • Get the collection of identical items
  • Get the collection of different items.


In my case, I needed to obtain such compared collections in several projects (Xml files, Open Xml packages, swagger files, ms build project settings… I talked about in previous posts).

Several interfaces that come with .net may be of help in many contexts (think about IComparable, IEquitable… etc.). Though quite efficient for sorting and equality tests, they do not seem to be the right choice for solving this particular need for comparing collections.


For a collection to produce what we need (identical items, different items and items not in 'another' collection), its items must be able to provide answers to several basic questions.

For an item to tell if it is 'different' from or 'identical' to another, they must first be 'comparable'.

In the case of an Xml node for instance, we might consider that two nodes having the same name are comparable. They then can be different if their values are different. And can be identical if their values are identical.

Let us assume an object that provides such answers:


public interface IComparableItem
{
   bool IsComparable(IComparableItem other);
   bool IsDifferent(IComparableItem other);
   bool IsIdentical(IComparableItem other);
}


And a generic collection of such items

public class ComparableSet<T> : List<T> where T: IComparableItem


In such collection, we can then extract items matching our needs:


// items not in the other collection
public List<T> ItemsNotIn(ComparableSet<T> otherSet)

{
   List<T>      list   = new List<T>();

   if(otherSet == null)
      return list;

   foreach(var item in this)
   {
      // get an item of the other collection that is comparable to this item
      var comparable   = otherSet.FirstOrDefault(i => i.IsComparable(item));

      if(comparable == null)
         list.Add(item);
   }

   return list;
}


Sample implementation - The comparable item


public class ComparableSetItem : IComparableItem
{
   public string Name      { get; set; }
   public string Value      { get; set; }

   public bool IsIdentical(IComparableItem other)
   {
      ComparableSetItem   obj   = other == null ? null : other as ComparableSetItem;
      if(obj == null)
         return false;

      if(obj == this)
         return true;

      return obj.Name == this.Name && obj.Value == this.Value;
   }

   public bool IsDifferent(IComparableItem other)
   {
      ComparableSetItem   obj   = other == null ? null : other as ComparableSetItem;

      if(obj == null || obj == this)
         return false;

      return obj.Name == this.Name && obj.Value != this.Value;
   }

   public bool IsComparable(IComparableItem other)
   {
      ComparableSetItem   obj   = other == null ? null : other as ComparableSetItem;

      if(obj == null || obj == this)
         return false;

      return obj.Name == this.Name;
   }
}


The comparable generic collection


public class ComparableSet<T> : List<T> where T: IComparableItem
{
   // items not in the other collection
   public List<T> ItemsNotIn(ComparableSet<T> otherSet)
   {
      List<T>      list   = new List<T>();

      if(otherSet == null)
         return list;

      foreach(var item in this)
      {
         var comparable   = otherSet.FirstOrDefault(i => i.IsComparable(item));

         if(comparable == null)
            list.Add(item);
      }

      return list;
   }


   public List<T> IdenticalItems(ComparableSet<T> otherSet)
   {
      List<T>      list   = new List<T>();

      if(otherSet == null)
         return list;

      foreach(var item in this)
      {
         var identicals   = otherSet.Where(i => i.IsIdentical(item));

         if(identicals == null)
            continue;

         foreach(var itemx in identicals)
            list.Add(itemx);
      }

      return list;
   }


   public List<T> DifferentItems(ComparableSet<T> otherSet)
   {
      List<T>      list   = new List<T>();

      if(otherSet == null)
         return list;

      foreach(var item in this)
      {
         var      diffs   = otherSet.Where(i => i.IsComparable(item));

         if(diffs == null)
            continue;

         foreach(var otherItem in diffs)
         {

            if(item.IsDifferent(otherItem))
               list.Add(otherItem);
         }
      }

      return list;
   }
}


A simple console method to test this implementation


public static void TestComparableSets()
{
   
ComparableSet<ComparableSetItem>   list1   = new ComparableSet<ComparableSetItem>();
   
ComparableSet<ComparableSetItem>   list2   = new ComparableSet<ComparableSetItem>();

   list1.Add(new ComparableSetItem() { Name = "name1",    Value = "value1" });
   list1.Add(new ComparableSetItem() { Name = "name2",    Value = "value2" });
   list1.Add(new ComparableSetItem() { Name = "name3",    Value = "value3" });
   list1.Add(new ComparableSetItem() { Name = "name4",    Value = "value4" });
   list1.Add(new ComparableSetItem() { Name = "name5",    Value = "value5" });

   list2.Add(new ComparableSetItem() { Name = "name1",    Value = "value10" });
   list2.Add(new ComparableSetItem() { Name = "name2",    Value = "value2" });
   list2.Add(new ComparableSetItem() { Name = "name3",    Value = "value30" });
   list2.Add(new ComparableSetItem() { Name = "name30",   Value = "value300" });
   list2.Add(new ComparableSetItem() { Name = "name40",   Value = "value40" });
   list2.Add(new ComparableSetItem() { Name = "name5",    Value = "value5" });
   list2.Add(new ComparableSetItem() { Name = "name50",   Value = "value50" });
   list2.Add(new ComparableSetItem() { Name = "name6",    Value = "value60" });

   var      list1NotIn2 = list1.ItemsNotIn(list2);       // {n4/v4}
   var      list2NotIn1 = list2.ItemsNotIn(list1);       // {n30/v30},  {n40/v40},
                                                         // {n50/v50},  {n6/v60}
   var      list1Diff2  = list1.DifferentItems(list2);   // {n1/v10},   {n3/v30}
   var      list2Diff1  = list2.DifferentItems(list1);   // {n1/v1},    {n3/v3}
   var      ident12     = list1.IdenticalItems(list2);   // {n2/v2},    {n5/v5}
   var      ident21     = list2.IdenticalItems(list1);   // {n2/v2},    {n5/v5}
}


Using the strategy pattern

The above implementation assumes that you have control upon the collection items structures and are able to change their code.

If that is not the case (like, for instance, when using objects defined in a third party's library) you may use the strategy design pattern in a way similar to the IComparer interface.


public interface ICollectionItemComparer
{
   bool IsComparable(object obj1, object obj2);
   bool IsDifferent(object obj1, object obj2);
   bool IsIdentical(object obj1, object obj2);
}


The generic collection may then be defined in a way similar to the following:


public class ComparableSet<T> : List<T> where T: class
{
   // sample items not in the other collection using strategy pattern
   public List<T> ItemsNotIn(ComparableSet<T> otherSet, ICollectionItemComparer comparer)
   {
      List<T>      list   = new List<T>();

      if(otherSet == null)
         return list;

      foreach(var item in this)
      {
         var comparable   = otherSet.FirstOrDefault(i => comparer.IsComparable(item, i));

         if(comparable == null)
            list.Add(item);
      }

      return list;
   }

A MMXVI side walk: roman numerals

Numeral systems are fascinating!

Presenting values in various numeral systems reveals some hidden aspects of these values and sometimes reveals more about our Human History and knowledge evolution.

Roman is one of these systems. (you may have a look here, here, or here)

A few years ago, I wrote a method to convert decimal numbers into roman. That worked well. The customer wanted a converter for numbering paragraphs. Up to 50 would be largely enough, he said. The developer in my head pushed me up to 9999 (sadly, I abandoned here by lack of time)

A few days ago, I saw someone wearing a T-shirt with 'XCIV' logo. And that reminded me that I never wrote the reverse conversion (from roman to decimal).

That was a good occasion to write this. And as I also have a friend who wants to practice C#, that may be a good exercise.

I found back my old code (to discover it was all to be rewritten!)… and I started working on a new version!

Roman numerals. A brief presentation

As you may know, Roman numerals building blocks are:

Roman

Decimal

I

1

V

5

X

10

L

50

C

100

D

500

M

1000


Intermediate values (like in the table below, between 1 and 10) are additions and subtractions of these basic building blocks

Roman

Decimal


I

1


II

2

1 + 1

III

3

1 + 1 + 1

IV

4

5 – 1

V

5


VI

6

5 + 1

VII

7

5 + 1 + 1

VIII

8

5 + 1 + 1 + 1

IX

9

10 – 1

X

10


Going beyond the M (1000) [presentation and entries]

Roman numerals were, at their era, (an evidence) hand written (probably more often engraved on hard stones!).

That surely does not mean the people did not know or need to count beyond the 1000. We better never forget that numbers and mathematics are much older than our own era… and that most of the great advances in this area had been achieved in other older civilizations!.

My problem here is just a presentation question: how can I write roman numbers beyond the M (1000)?

Old traditionalists use quirky figures that do not seem easily writable using a 'keyboard'.

Like here:

Or here:

To make presentation and entries a little easier with our era's keyboards, I decided to combine other units to create building blocks beyond the 1000. Example: To present the 1000 – 9000 sequence, I used 'XM' and 'VXM':


"XM",

// 10000

"XMXM",

// 20000

"XMXMXM",

// 30000

"XMVXM",

// 40000

"VXM",

// 50000

"VXMXM",

// 60000

"VXMXMXM",

// 70000

"VXMXMXMXM",

// 80000

"CMXM",

// 90000


For the sequence 1m – 9m, I used characters that are not in the traditional roman building blocks: The 'U', 'W' and 'Y':

"U",

// 1000000

"UU",

// 2000000

"UUU",

// 3000000

"UW",

// 4000000

"W",

// 5000000

"WU",

// 6000000

"WUU",

// 7000000

"WUUU",

// 8000000

"UY",

// 9000000


Conversion processing units

The conversion manager object (iRomanNumberDictionary in the above figure) stores a list of roman building blocks.

Each building block corresponds to a decimal sequence factor (1, 10, 100, 1000… etc.) and stores the roman elements of this sequence (see the sample tables above). It also stores the roman group level (a vital info as you will see in the code!)

Decimal to roman

Now, to convert a decimal number into its roman presentation, we proceed this way (here, using 28 as an example):

  • Take the leftmost digit of the number (leftmost of 28 = 2)
  • Set the index of the sequence to look in = count of number's digits - 1 (for 28 that is 2 – 1 = 1)
    • Note: this target sequence is composed of: "X", "XX", "XXX", … etc.
  • Find the value of this sequence at the element index = the leftmost digit – 1 (2 – 1 = 1)
  • In our case, that would be "XX" (which is decimal 20)
  • Recurse call with the remaining digits of the number (remaining of "28" = "8")
    • Note: that call should return "VIII" (first sequence at the 7th position)
  • Add the string to the "XX" (that would then be "XXVIII")


Roman to decimal

Roman to decimal is a bit trickier!

Let us take the reverse conversion of the example above ("XXVIII") for which the conversion result should be 28.

  • The conversion step (a parameter) should be set to the highest index of our roman sequences (in my app, I used 7 sequence groups whose factors are: 1, 10, 100, 1000, 10000… 1000000)
  • We have to look for the string in all sequences whose group order is <= the current step
  • Do until we find something:
    • In our example: we look for "XXVIII" in all sequences whose group order is <= 7
    • As the string is not found in any sequence, we continue the search using the string minus 1 char "XXVII"… "XXVI"… "XXV"… "XX"
    • "XX" is found in the sequence whose decimal factor = 10 at number zero-index = 1
    • We store the following value in a List<int>: sequence's decimal factor * (number zero-index + 1). Which results in 10 * 2 = 20
  • Recurse call using the remaining string "VIII" and using the sequence group order – 1 as the conversion step. Add the returned number to our List<int>
  • Return the sum of integers of our List<int>


To better understand what goes on in the conversion process, I added a conversion history that explains the steps of each conversion.

Here is the processing history for XXVIII (28):


Another processing history for a greater roman number MMMXCVIII (3098):


You may download the code (WPF) HERE. Have fun extending and enhancing for the better!

Yet another [rather simple] OpenXML package explorer!

As its name implies, OpenXML is XML-centric technology (i.e. which extensively uses XML to describe the meta-model and contents of each and every element of a document).

OpenXML documents themselves (MS Word, Excel, PowerPoint…) are compressed packages that include numerous xml files which describe the document's meta-models and contents.

To explore these items, you can simply rename the document file to .zip and then navigate through this zip archive to view the elements that may be of interest.

After proceeding this way, you of course must not forget to rename the file back to its original extension (.docx, .xlsx… or whatever). When working on an OpenXML project, you obviously have to do this so many times a day, which becomes a somehow daunting task!

Some very good tools exist to explore OpenXML documents' structures… but most of them expose a logical view of the document rather than an xml-centric view. Which is of course very helpful… but does not apply when you just need to see the physical structure and the xml content of meta-models and elements.

Moreover, most of these tools are somehow out dated (2007-2009…) and many simply crash on most of our 'modern era' OSs!

Add some other good reasons to write another explorer:

It is august, it is raining and I don't know what to do this week end (while listening to Maria Joao Pires playing Mozart Sonatas!)


The purpose and tools?

What I need is:

  • Open an OpenXML document as a zip archive (without having to rename it to .zip!)
  • Explore the content of the archive (folders / files)
  • Explore / search the xml tree of xml files that may be found there


Adding a reference to System.IO.Compression and System.IO.Compression.FileSystem, you can (relatively easily) present the archive tree structure like in the following image:

I created a view model layer to map my needs to the zip archive objects of the System.IO.Compression namespace:

iZipEntryVM: a view model for zip archive entry which offers some useful properties related to my purpose.

iZipEntryVmList: a collection of the above object which offers static methods to create the tree of a zip archive file as well as a 'selected item' property and selection change event.

iOfficeVM: (singleton) entry point ('main view model' in a way) that orchestrates the basic commands and selection change events.


XML property bags explorer, again, to the rescue!

I wrote in a previous post about using PropertyBags to explore xml nodes.

The xml explorer objects, methods and controls written during this research are now packaged into an independent library that can be referenced in the current project.

What I have to do is just wire the selection event of an item in the archive tree to the xml explorer objects.


That is, when I click an xml file on the zip archive tree, the selection change event is fired. If the selected item is an xml content, it is opened and its stream is sent to the xml explorer object to display the node tree.


In practice:

  • On the TreeView control's selection changed event, the SelectedItem of the view model collection (iZipEntryVmList) is set.
  • The collection fires its own Selection changed event.
  • iOfficeVM subscribes to that event and send the entry stream to the xml explorer:


_myArchiveList.SelectedItemChanged += _list_SelectedItemChanged

private async void _list_SelectedItemChanged(object sender, iZipEntryVM selectedItem)
{
    ZipArchiveEntry    entry    = selectedItem.ZipEntry;

     if(entry == null)
       return;
 
    if(selectedItem.IsXmlFile)
        await Task.Run(() => OpenXmlFile(selectedItem));
}


async void OpenXmlFile(iZipEntryVM entryVm)
{
    ZipArchiveEntry    zentry    = entryVm.ZipEntry;
    var        bagVm    = XmlExplorer.Instance.PropertyBagVM;

    if(bagVm != null)
    {
        Stream            stream;
        await Task.Run(() =>
        {
            stream        = zentry.Open();
            // this will build the xml nodes' property bag tree
            bagVm.SourceStream = stream;
        });
    }
}


Apart from presenting the xml nodes' tree, XML explorer offers some other useful features:

  • Search for content values and/or node names
  • View / copy the xml string of a selected node
  • Export (save) the current OpenXML item to a file.


And, not less important, I no more have to rename a file to do that…!

Some screenshots

Explorer General View

Sample search results


Binaries and source code

You may download the binaries here

You may also download the source code here.

Convert a List<T> to List<something known only at runtime>

I fall into this while writing a data generator for sample objects.

Let us assume this:


public class SampleItem
{
public string name { getset; }
public SampleItem() { }
}


public class SampleClass
{
public List<SampleItem> ObjectList {  getset; }
public SampleClass() { }
}


Using Reflection, the data generator can easily see and assign a string value to SampleItem.Name property (notice: at runtime, our code does not know what SampleItem is)

For my purpose, it was important to insert some sample items into any List<T> property of an object.

In the above sample code that means, for a SampleClass instance, to generate a list of SampleItem to be assigned to the instance's ObjetcList property.

An elegant solution was found here. Its code is so simple:


public static object ConvertList(List<object> value, Type type)
{
var containedType = type.GenericTypeArguments.First();
return value.Select(item => Convert.ChangeType(item, containedType));
}


Example usage:


var objects = new List<Object> { 1, 2, 3, 4 };
ConvertList(objects, typeof(List<int>)).Dump();


That didn't work for my case. I could not assign the ObjectList property (I got an exception) because the resulting value generated by the code above was in fact a Lis<object>. It only converted the items contained into the list into SampleItem, the list itself was not a List<SampleItem> it was still a List<object>


The solution (less elegant, but still efficientJ):


static object ConvertList(IEnumerable<object> value, Type listType)
{
var containedType = listType.GenericTypeArguments.First();
var tmpList     = value.Select(item => Convert.ChangeType(item, containedType)).ToList();
var newList     = Activator.CreateInstance(listType);
MethodInfo addMethod = listType.GetMethod("Add");

foreach(var item in tmpList)
  addMethod.Invoke(newList, new object[] { item });

return newList;
}


That converts a List<object> and returns an object of the type expected by the property (a List<T>)

Back end – front end: Services loose coupling

Most mobile solutions are built and operate in a distributed architecture where services play a prominent role for providing data and applying business logic.

Let us take an example of a hotel reservation mobile app:

  • When the user specifies the desired target city, a back end service would provide the list of available managed/operated hotels at this place.
  • Once he or she specifies the desired stay period, the service would filter the above list to provide those having free rooms for that period.
  • When the user selects a room and applies for the reservation, the service would then register that reservation, proceeds to payment… etc.

It is hardly imaginable for such an app to operate independently from a back end service.


The price of distributed apps

In the previous example, the mobile app presents and manipulates several objects: the place (city/location…), the hotel, the room… etc.

Information about each of these objects is obtained from the service. The structures (metadata) of objects transmitted by the service should obviously match those handled by the mobile app.

In a typical (SOAP) situation, using Visual Studio for instance, your mobile app project would reference the service. Through the service's WSDL file, Visual Studio would generate the code for objects (classes) and operations defined by that referenced service.

If one of service's objects structure changes, you have to relaunch the process to update your app's service reference so that your objects' metadata be in sync with those defined by the service. If you don't do this, your app will simply crash at the first service call involving any unmatched object!

After each single change, deploying the solution's components (service / client app) become also a big hurdle.

In a few solutions, that may be desirable (or required). In most, the hurdle surpasses the benefits. It is hardly sustainable in a large solution. Actually it is not even sustainable when you are the sole developer of both components!

Resorting to use REST instead of SOAP (you may combine both) does not solve the difficulty, as that only changes the serialization format.


Using one single object

Let us imagine a service whose operations return always the same object. That would be quite handy independently of that object's serialization format.

In several large solutions I came to explore during last years, aggregating services responses into an abstract object, say, ServiceResponse was a common design practice. A given service operation response may look like (wsdl):

<element name="Operation1Response">
    <complexType>
        <sequence>
            <element name="Operation1Output"    type="Operation1OutputObject"/>
            <element name="ServiceStatus"     type="ServiceStatus"/>
        </sequence>
    </complexType>
</element>


With this, you know that any service operation you may call will always return a structure containing your expected object along with a service status object.

That approach seems good. Still it is going half way in abstraction, because you still should know the exact structure (metadata) of the expected object. And hence doesn't solve the evolution and deployment hassle: if, for some reason, you change the service's object structure, all your consumers should sync this change before deployment. The deployment of a new service version requires the deployment of a new consumers' versions… big hassle = increased risks.


Back to property bags!

I previously talked about property bags (here and here…).

A short reminder:
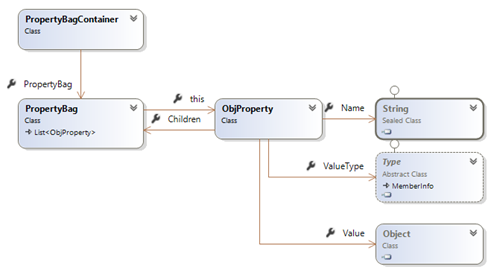
  • Objects (as we know till nowJ) are structures composed of: properties, methods and events.
  • An object can be considered as a set of properties (a property bag)
  • An object property can be defined as:
    • A name
    • A data type
    • A Value
  • Property value can be either:
    • A primitive type (value type or whatever we may consider as 'primitive'… string for instance)
    • A composite type: an object itself containing a set of properties (=property bag)


With that simple structure we are able to represent virtually any object in a strongly-typed manner.


Using property bags, we can imagine a unique structure for our service response. Which may look like this (wsdl):

<element name="ServiceResponse">
    <complexType>
        <sequence>
            <element name="OperationOutput"    type="PropertyBag"/>
            <element name="ServiceStatus"     type="PropertyBag"/>
        </sequence>
    </complexType>
</element>


Now, when we call any service operation, we know in advance that it will return an output property bag, accompanied with a status property bag.

Each element of our property bag being strongly typed (specifies its data type), we can easily convert the received bag to the expected object.

That conversion itself can be subject to a set of business rules. But that would be implemented 'once' independently of service or consumer versions and deployment constraints.


This approach doesn't eliminate the need for a unified business model. It enforces its usage.

By creating a loose coupling mechanism between services and consumers it allows more separation of concerns and minimizes evolution and deployment risks.
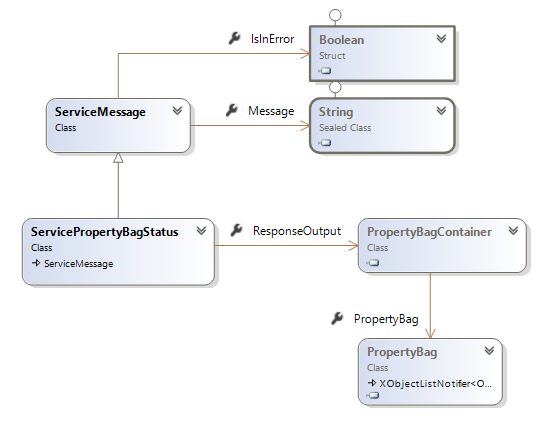
Exercise: service side code sample

Let us define service response as:

[DataContract(Namespace = "")]
public partial class ServicePropertyBagStatus : ServiceMessage

{
    PropertyBagContainer    _responseOutpput;

    [DataMember]

    public PropertyBagContainer ResponseOutput

    {

        get { return _responseOutpput; }

        set { _responseOutpput = value; }

    }
    …
    …

Our response structure would then look like (wsdl):

<complexType name="ServicePropertyBagStatus">
    <complexContent mixed="false">
        <extension base="ServiceMessage">
            <sequence>
                <element name="ResponseOutput" type="PropertyBagContainer"/>
            </sequence>
        </extension>
    </complexContent>
</complexType>


Sample code of a service operation (for reading a customer data) may look like this:

[OperationContract]
public ServicePropertyBagStatus GetCustomer(int customerId)

{
    return SvcUtilities.LoadCustomer(customerId);

}

Our service utilities module method LoadCustomer:

public static ServicePropertyBagStatus LoadCustomer(int customeId)
{
    ServicePropertyBagStatus    status    = new ServicePropertyBagStatus();

    if(customerId == 0)
    {
        status.SetErrorMessage("No value provided customerId");
        return status;
    }

    // load the customer's info from database server

    Customer        customer    = Customer.LoadDbUser(customerId);

    // extract this object's data contract into a property bag container

    status.ResponseOutput = ExtractPropertyBagContainer(customer.GetType(),customer);

    // return the service response status

    return status;
}

Extract the object's property bag:

internal static PropertyBagContainer ExtractPropertyBagContainer(Type type, object obj)
{
    // get soap xml of the object's data contract

    DataContractSerializer serializer = new DataContractSerializer(type);
    MemoryStream stream = new MemoryStream();

    serializer.WriteObject(stream, obj);

    // parse the soap xml into a property bag container
    PropertyBagContainer container = PropertyBagContainer.ParseXml(stream, true, null);

    stream.Close();
    return container;

}

Some Property bag container helper methods:

public class PropertyBagContainer
{
    protected PropertyBag _bag;


    // parse an object into a property bag container
    public static PropertyBagContainer ParseObject(object obj, ObjProperty parent);

    // parse xml stream into a property bag container
    public static PropertyBagContainer ParseXml(Stream stream, bool parseSiblings, ObjProperty parent);

    // parse xml node tree into a property bag container
    public static PropertyBagContainer ParseXml(XElement xnode, bool parseSiblings, ObjProperty parent);
}

Client side code sample

Our service operations will now return a Property Bag Container containing the expected object's property bag. A helper static method of PropertyBag (AssignObjectProperties) allows us to assign its content to a specific object:

public static bool AssignObjectProperties(object targetObject, PropertyBag bag)


We can thus write:

public bool ParsePropertyBag(PropertyBag bag)
{

return PropertyBag.AssignObjectProperties(this, bag);

}


Assigning property bag contents to an object is done by assigning values of the bag items to object's properties having the same name and data type. Extra logic can be introduced here according to your business requirements (for instance: checking object integrity through specific attributes).


Now, on the service consumer application, assume we have a service that is referenced as CustomerService. We may call the service's LoadCustomer operation like in the following code:

public bool LoadServiceCustomer(int customerId)
{
    CustomerService proxy = new CustomerService();
    var status = proxy.
LoadCustomer(customerId);


    // we may check the service status for errors here 
     ….

    // assign received properties to this object
    return this.ParsePropertyBag(status.ResponseOutput.PropertyBag);
}

Client side with Json

The process is the same in a REST configuration (You may see some details about WCF REST services here) as you actually will always receive a ServicePropertyBagStatus object independently of the transmission format (xml / json… etc.). Parsing the received response into a property bag container can be done using components like the .Net NewtonSoft.Json:

HttpWebRequest request = (HttpWebRequest) WebRequest.Create(url);
string str = GetResponseString(request);
ServicePropertyBagStatus  response = JsonConvert.DeserializeObject<ServicePropertyBagStatus>(str);
PropertyBagContainer container    = response.ResponseOutput;

You can download the property bag binaries (std + portable) here.

Xamarin forms maps – let’s talk renderers: 2. Droid

Let us go back to Xamarin Forms Maps!

In a previous post, I exposed a WinPhone custom renderer for maps.

The object of our renderer is to:

  • Display custom pushpin (marker) icon
  • Display a custom info window for each place (pushpin / marker)


The custom renderer

Our Droid custom renderer will derive from MapRenderer and, for reasons we will see later, will implement the GoogleMap.IInfoWindowAdapter:


[assembly: ExportRenderer (typeof(iMaps.iCustomMap),
                                    typeof(iMaps.Droid.iCustomMapViewRenderer))]


namespace iMaps.Droid
{
    public class iCustomMapViewRenderer : MapRenderer, GoogleMap.IInfoWindowAdapter


Customizing the marker icon

In android, markers can relatively easily be customized to show a custom icon. Here, we use the custom icon of our Custom pin


iCustomPin    customPin    = pin.BindingContext as iCustomPin;
string    resourceName    = System.IO.Path.GetFileNameWithoutExtension(customPin.IconResource);
int        resourceId        = Context.Resources.GetIdentifier(resourceName, "drawable",
                                        Context.PackageName);

bmp = BitmapDescriptorFactory.FromResource(resourceId);
marker.SetIcon(bmp);

Setting markers and their custom icons will be done when the map is to be rendered (i.e. in the OnElementPropertyChanged override of our renderer). That is best done once when the map will be ready.

To know when the map is ready, we must implement the IOnMapReadyCallback Interface which defines one only method: void OnMapReady(GoogleMap googleMap). With this in place, google maps will call us when the map is ready.

Our renderer will thus now look like this:

public class iCustomMapViewRenderer : MapRenderer, GoogleMap.IInfoWindowAdapter,
IOnMapReadyCallback

Our OnMapReady method will set variables required for drawing the map.


GoogleMap            _map;

public void OnMapReady (GoogleMap googleMap)
{
    _map        = googleMap;
    _map.InfoWindowClick    += Map_InfoWindowClick;

    // required if you wish to handle info window and its content
    _map.SetInfoWindowAdapter (this);
}

OnElementPropertyChanged of our renderer will proceed to putting the pins on the map:


bool                _isDrawingDone;

protected override void OnElementPropertyChanged (object sender,

                                        PropertyChangedEventArgs e)
{
    base.OnElementPropertyChanged (sender, e);

    if(_map == null || _isDrawingDone || e.PropertyName != "VisibleRegion")
        return;

    _map.Clear ();
    _map.MarkerClick            += HandleMarkerClick;
    _map.InfoWindowClick    += Map_InfoWindowClick;

    foreach (var pin in _mapPins)
    {
        var            marker        = new MarkerOptions ();
        iCustomPin    customPin    = pin.BindingContext as iCustomPin;

        marker.SetPosition (new LatLng (pin.Position.Latitude, pin.Position.Longitude));
        marker.SetTitle (pin.Label);

        if(! string.IsNullOrEmpty(pin.Address))
            marker.SetSnippet(pin.Address);

        BitmapDescriptor    bmp        = null;

        string    resourceName    =
                    System.IO.Path.GetFileNameWithoutExtension(customPin.IconResource);
        int        resourceId        = Context.Resources.GetIdentifier(resourceName,
                                                "drawable", Context.PackageName);

        bmp = BitmapDescriptorFactory.FromResource(resourceId);
        marker.SetIcon(bmp);

        _map.AddMarker(marker);
    }

    _isDrawingDone = true;
}


Customizing the popup info window

Customizing the popup info window is a different kettle of fish ('une autre paire de manche' en françaisJ)

Why?

Simply because the google maps documentation says that the info window is a View, but specify this interesting note:

Note: The info window that is drawn is not a live view. The view is rendered as an image (using View.draw(Canvas)) at the time it is returned. This means that any subsequent changes to the view will not be reflected by the info window on the map.


To update the info window later (for example, after an image has loaded), call showInfoWindow(). Furthermore, the info window will not respect any of the interactivity typical for a normal view such as touch or gesture events. However you can listen to a generic click event on the whole info window as described in the section below.


So, it IS a View… but NOT REALLYJ

Let us be more specific: it is NOT a view. It is actually a Bitmap.


Anyway, to be able to customize the info window, our renderer must implement the GoogleMap.IInfoWindowAdapter Interface. Which defines two methods:

  • View GetInfoContents(Marker marker);
  • View GetInfoWindow(Marker marker);


GetInfoWindow: returns the entire popup window. If it returns null, then it is GetInfoContents which will define the contents of the default info window frame of the marker popup.

As the 'pseudo-view' returned in both cases are not really views but bitmaps, our task is to compose a view of the pin information before transforming this to a bitmap.


In our current exercise, we will return the window content. Therefor our GetInfoWindow() will return null.

public Android.Views.View GetInfoWindow(Marker marker)
{
    return null;
}

From Xamarin Forms Xaml à to Native View à to Bitmap: dangerous tour!

As I am not a 'droid boy', I decided to create a Xamarin Forms control (ContentView) and use this in the custom renderer. You may of course decide differently to use a Droid axml control. In both ways, we will have to convert that control's content into Bitmap.

Here is my ContentView Xaml (assumed to be bound to an iCustomPin):


<StackLayout Spacing="4" >
    <Image Source="{Binding ImageFile}"
            WidthRequest="84" HeightRequest="84" HorizontalOptions="StartAndExpand" />
    <Label FontAttributes="Bold" Text="{Binding Name}" />
    <BoxView HeightRequest="1" BackgroundColor="Gray"
                HorizontalOptions="FillAndExpand" VerticalOptions="Start" />
    <Label x:Name="labelText" Text="{Binding MapPinText}" LineBreakMode="WordWrap" />
</StackLayout>

Our GetInfoContents method will have to:

  • Identify the clicked custom pin
  • Set the binding context of the above ContentView to that pin
  • Transform that XF control to a native Droid ViewGroup
  • Transform the resulting droid native ViewGroup into a bitmap to be returned to Google maps.

The following code illustrates these steps:


iMapPinInfoCtrl        xamInfoPanel    = new iMapPinInfoCtrl();

public Android.Views.View GetInfoContents(Marker marker)
{
    iCustomMap     myMap         = this.Element as iCustomMap;
    iCustomPin     customPin     = myMap.GetPinAtPosition(
                new Position(marker.Position.Latitude, marker.Position.Longitude));
    double            infoWidth        = this.Control.Width * 0.70,
                        infoHeight        = 380.0 / 2.8;
    SamplePlace    place                = customPin.DataObject as SamplePlace;

    xamInfoPanel.BindingContext = place;

    // get the droid native control
    ViewGroup    viewGrp        = DroidXFUtilities.ConvertFormsToNative(
                xamInfoPanel.Content, new Rectangle(0, 0, infoWidth, infoHeight));

    // transform the native control into a bitmap
    Bitmap        bmp            = DroidXFUtilities.ViewGroupToBitmap(viewGrp,
                                                    this.Context,
                                                    (int)infoWidth, (int)infoHeight,
                                                    true);

    _pinImage.SetImageBitmap(bmp);

    return _pinImage;
}

To Native ViewGroup

An interesting post from Michael Ridland helped solve this task!

Get the native droid ViewGroup of XF View code snippet:


public static ViewGroup ConvertFormsToNative(Xamarin.Forms.View view,
                                            Rectangle size)
{
    var        vRenderer        = Platform.CreateRenderer(view);
    var        viewGroup        = vRenderer.ViewGroup;

    vRenderer.Tracker.UpdateLayout();

    var        layoutParams    = new ViewGroup.LayoutParams((int)size.Width, (int)size.Height);

    viewGroup.LayoutParameters        = layoutParams;
    viewGroup.DrawingCacheEnabled    = true;
    view.Layout(size);
    viewGroup.Layout(0, 0, (int)size.Width, (int)size.Height);
    return viewGroup;
}

Native ViewGroup to Droid.Graphics.Bitmap

I must first confess that this task was hard for meJ.

I read some articles about the subject, of which this interesting one "Converting Views to Bitmap Images in Android"… but, in the practical exercise, couldn't grasp how to get precise measures of rendered elements!

The task steps is to:

  • Create a Linear Layout
  • Create a Bitmap and put it into a Canvas
  • Loop through the ViewGroup's elements (Views) and add them to the Layout
  • Draw the Layout into the Canvas
  • Return the Bitmap (which will contain the rendered layout's views)

Getting the precise measures of views is not simple. Notably for images and labels with text wrap attribute.

Here is a simplified snippet of my code (assuming that no images are part of the ViewGroup's elements). The solution's source code has more details about handling images. But you should be able to do much better if you are an android expertJ


public static Android.Graphics.Bitmap ViewGroupToBitmap(ViewGroup viewGroup,
                                             Context context,
                                             int width, int height)
{
    int        viewCount = viewGroup == null ? 0 : viewGroup.ChildCount;
    Android.Widget.LinearLayout layout        = new Android.Widget.LinearLayout(context);
    Bitmap    bmpLayout    = Bitmap.CreateBitmap(width, height, Bitmap.Config.Argb8888);
    Android.Graphics.Color    white        = Android.Graphics.Color.Argb(0xff, 0xff, 0xff, 0xff);

    layout.DrawingCacheEnabled            = true;
    layout.SetBackgroundColor(white);

    Canvas    canvas    = new Canvas(bmpLayout);

    // add the sub views contained in this view group
    for (int ndx = 0; ndx < viewCount; ndx++)
    {
        Android.Views.View view = viewGroup.GetChildAt(0);

        int            wid            = Math.Max(0, view.MeasuredWidth),
                        hi                = Math.Max(0, view.MeasuredHeight);

        viewGroup.RemoveView(view);
        layout.AddView(view, wid, hi);
    }

    layout.Draw(canvas);

    return bmpLayout;
}


The result looks like this:


You may Download the code Here

XML – the ASCII of our era

At the dawn of XML, Tim Bray once said "XML is the ASCII of the future"… which is now clearly the case!


To ease reading and handling XML files, I started writing an XML browser last year. The 'Open file' menu of the app first proposed '*.xml' file extension.

As you may imagine, quite quickly that expanded to so many other file extensions: *.xml; *.xaml; *.xsd; *.wsdl; *.csproj; *.vbproj; *.dwproj; *.rptproj; *.config; *.dim; *.ds?; *.cube; *.partitions; *.manifest; *.database; *.rsd; *.rds; *.rdl the list is actually endless!

Why write a XML browser / editor?

Most XML tools I found look more like good (some excellent) editors / syntax visualizers. What I needed more was to have a logical image of the tree structure of an XML file: which node is parent of which…

Xml Note Pad did part of this but was more text-editor-oriented than logical structure visualizer. Its most recent version also dates 2007… time is running!

Of course there is not one sole way to handle such question. Visualizing the tree structure is one aspect. Editors with syntax highlighting, nodes expand/collapse… are still of course very useful.

Let us take a simple user control xaml file with the code similar to this:


Viewing the above code's node tree helps better understand its structure:


How can we handle XML tree presentation?

XML code is composed of some foundation elements:

  • The element name (the xml tag… which is part of a namespace).
  • The element property (or properties). Which may be either:
    • A value (string / primitive type)
    • A composite element:
      • A set of attributes
      • And / or a set of child elements


A simple example:

<person gender="female">

Element = person, gender = an attribute whose value is female

  <firstname>Anna</firstname>

firstname (property of person) whose value is Anna

  <lastname>Smith</lastname>

lastname (property of person) whose value is Smith

</person>

End of the composite element person


The above code can also be written like this (1st attribute shifted to a property level):

<person>
  <gender>female</gender>
  <firstname>Anna</firstname>
  <lastname>Smith</lastname>
</person>


You may look here for more information about the XML model.


At our .net level, we have objects defined in System.Xml.Linq that allow us to (more or less easily) explore, traverse and query a XML tree. Some of these:

  • XDocument (derives from à XContainer à XNode à XObject)
  • XElement (derives from à XContainer à XNode à XObject)


These xml-specialized objects are indispensable to safely communicate with the xml model, but are not good candidates for a view to represent the xml tree.

In some way, in a MMVM pattern, they represent the model (and business logic). We need an intermediate component that can be integrated into a view model and a view.

Property Bags to the rescue

I briefly mentioned property bags in a previous post about MSBuild browser. Let me elaborate a little more about this.

A property bag is a set of abstracted properties. Where a property is presented as:

  • A name
  • A data type
  • A value

And where the property 'value' can be either:

  • An object or primitive value (string for instance)
  • Or a set of properties (i.e. a property bag)


This model proved quite useful in many contexts. You may for instance transform any object into a property bag representing its properties (in a strongly-typed form). This can be quite useful in situations where loose coupling is a concern (applications ßà services for instance). I will talk about this in details later in a following post.


For our current question about presenting xml trees, property bag model seems to be in sync with the xml model:

Xml element:

name / value / attributes / sub-elements (children)

Property bag element:

name / value / sub-elements (children)


To clarify by the practice, here is an example for parsing a XElement attributes into a property bag:


static PropertyBag ParseXmlNodeAttributes(XElement xnode, ObjProperty parent)
{
    // create a property bag as a child of the parent property
    PropertyBag targetBag    = new PropertyBag(parent);

    // add the xml element attributes to the bag
    foreach (XAttribute attrib in xnode.Attributes())
    {
        targetBag.Add(attrib.Name.LocalName, attrib.Value);
    }

    return targetBag;
}


Parsing a XElement can be done in a few steps:

  • Create an ObjProperty with name = xml element's name
  • If the element's value is composite (attributes and/or child items): add element's attributes and children to the ObjProperty Children
  • Otherwise set the ObjProperty value to the element's value


The following code illustrates this (simplified version of the code for clarity)


public static PropertyBag ParseXml(XElement xnode, ObjProperty parent)
{
    string            propertyName    = xnode.Name.LocalName;
    PropertyBag    bagObject        = new PropertyBag(propertyName);
    ObjProperty    property            = new ObjProperty(propertyName);
    PropertyBag    bagAttributes    = new PropertyBag();
    PropertyBag    bagSubItems    = new PropertyBag();

    // get the XEelement attributes' bag
    bagAttributes    = ParseXmlNodeAttributes(xnode, property);

    // add attributes (if any) to Children
    if (bagAttributes.Count > 0)
    {
        bagObject.AddRange(bagAttributes);
    }

    // add sub elements if any
    var        subNodes        = xnode.Descendants();

    foreach(var element in subNodes)
    {
        string            nodeName        = element.Name.LocalName;
        PropertyBag    elementBag    = ParseXml(element, property);

        ExtractPropertyValue(bagSubItems, elementBag, nodeName, property);
    }

    bagObject.AddRange(bagSubItems);

    return bagObject;
}


The Xml Property Bags' view model

Presenting a property bag in a view requires some additional properties that are specific for a view. For instance, an 'Expanded' property for a tree node, a 'Selected' property for an item, as well as useful commands and search/filter features… etc.

Our property bag view model will embed the bag item and adds such properties.


The Xml Property Bags' Views

We need to present our xml property bags in either a tree view or a grid view.

As I said earlier, a property bag item contains either a primitive value (which may be presented as a string) or a set of child items.

In a WPF tree view that can be presented like this (code simplified for clarity):

    <!-- import view model namespace -->
    xmlns:vm="clr-namespace:iSoapExplorer2015.viewmodel"


<TreeView x:Name="treeView1" ItemsSource="{Binding Containers}">

    <TreeView.ItemTemplate>
        <!-- hierarchial data template for containers items -->
        <HierarchicalDataTemplate
                    DataType="{x:Type vm:PropertyBagItemVM}"
                    ItemsSource="{Binding Containers}" > <!-- Containers = property bags -->
            <StackPanel Orientation="Horizontal">
                <!—note: 'Node' is the property bag item -->
                <TextBlock Text="{Binding Node.Name}"/>    
            </StackPanel>
        </HierarchicalDataTemplate>

    </TreeView.ItemTemplate>


That results is a view that looks like the one at the beginning of this post (with an image added to the tree view item template)

A data grid view may look like this (again: code simplified for clarity):


<DataGrid ItemsSource="{Binding }">
    <DataGrid.Columns>
        <DataGridTextColumn Header="Property" Binding="{Binding Node.Name}" />
        <DataGridTemplateColumn Header="Value" Binding="{Node.ValueAsString}" />
    </DataGrid.Columns>
</DataGrid>

For a xaml Stack Panel snippet element, our view may look like this (an image column added to the above simplified code):


With some more work, you may implement more useful features and visual effects.

The current version offers: Xml nodes Tree and Grid views, Search nodes (by name and / or value), get the selected node XML, Export the entire tree to an xml file… etc.


I stopped short from editing the nodes (names / values)… but you may add such feature (before I do… probably in a near futureJ)


Here is the current version's binaries.

Have fun adding new features to the source code if you would like to.