Taoffi's blog

prisonniers du temps

Xamarin forms: write once (and again!) – Commencement pitfalls - I


Intro

Xamarin approach is, without doubt, a great innovation in that it allows developers to cross platform barriers by using one same programming language. This great work started by Ximian's Mono implementation of the .NET framework on Linux. And, thus, by the .NET framework itself!

Extending Mono to be a cross platform mobile framework is a great effort and a compelling expression of the need to normalize the software development process beyond commercial competitions, ultimately for the benefit of all businesses and individuals.

Well… that is about a general view of 'what it is' and why we may use it:)

Now, to start using it is a slightly another question that often needs some craftsmanship skills and pragmatic solutions for elementary problems. Don't expect it to be that easy!

One reason for this is that Xamarin development environment is still immature and lacks many features. Its integration with Visual Studio is even too rudimentary to fulfill some usual tasks (adding a 'new item' to a project is often a tedious process… no xaml design space… Intellisense is too basic, when it works at all!). The advantages of using Xamarin forms are still so huge that it really worth trying!

With the time and adoption of the environment, these pitfalls will of course be gradually solved (at least that is what we hopeJ).

Anyway, here, I will try to list some solutions for common pitfalls I encountered when I started with Xamarin using Visual Studio (and, sometimes, Xamarin Studio). I hope my solutions for these pitfalls will soon become obsolete (the sooner, the better!). I promise then to keep them online just for History!

IDE choice: Visual Studio + Xamarin Studio…

Your IDE choice is either Xamarin Studio and/or Visual Studio (through a plug-in).

Xamarin Studio performs nicely and its xaml Intellisense (which often works!) helps avoid typo errors. At the same time it does not handle WinPhone projects. And, when run on Windows, it does not handle iOS projects neither!

In Visual Studio, with the xamarin plug-in, the project management scope is global: you manage all platform projects (the WinPhone project (of course!), Android and iOS (a connection to a Mac – with XCode installed – is required for iOS compilation))

Xamarin plug-in for Visual Studio is still a little immature. So, in Visual Studio, you may from time to time encounter issues with the Intellisense. Build action configuration does not also seem to be correctly handled by the Xamarin plug-in. We will see some solutions for these issues. Restarting Visual Studio sometime helps resolve some discrepanciesJ

It is often useful to use Xamarin Studio for some operations (build action when adding resources or xaml files is better handled than in VS plug-in)

I mainly use Visual Studio, and occasionally navigate to Xamarin Studio for some tasks. Many of the solutions mentioned here are specific to Visual Studio.

What is a Xamarin Forms solution (.sln)?

A XF solution is composed of two code areas:

  • A common PCL (Portable Class Library) project
  • A per-platform project which contains the specific platform objects, code, resources and configuration. And which references (uses) the PCL project objects, code and resources.

For a common XF solution (iMaps in the illustration), you will have:

  • The PCL library project (iMaps.dll): code and resources shared by all platforms
  • iMaps.iOS project: specific code, resources and configuration for iOS
  • iMaps.Droid project: specific code, resources and configuration for Android
  • iMaps.WinPhone project: specific code, resources and configuration for Windows Phone.

Each of these projects may, of course, reference other PCL or platform-specific libraries.

Xaml: where is the xaml design surface?

If you are new to XF, or are not posted yet: just relax, sit down, (have a beer if you can):

YOU DON'T HAVE an XAML DESIGN UI!

That is obviously a big missing link in Xamarin forms. Not only you are just abandoned to write xaml code without seeing its (potential) output, even your xaml typos get caught only at runtime (with a horrible app crash of course!)

Your options? Not so many:

You have Gorilla Player (promising and quickly evolving)… other approaches and efforts are also underway.

Gorilla allow you (at design time) to instantly preview your xaml content page (or content view) on a device or an emulator, and will catch your xaml errors and typos and tell you their exceptions details. It is also able to run simultaneously on Android and iOS (devices or emulators).


The application resources: the App.xaml and App.xaml.cs pitfall

It is quite useful to define a set of resources available for all objects in a project. Traditionally, in a WPF or Silverlight project, these resources are defined in App.xaml and used in other xaml files as StaticResources. If you create a WPF or Silverlight project, the project template creates two files: App.xaml and App.xaml.cs. The first is to contain the xaml resources, the second contains the application methods and properties.

When you create a new Xamarin Forms solution, your PCL project would have only an App.cs file but no App.xaml file.

To solve this:

  • Close the solution (or at least unload the PCL project)
  • Navigate to the PCL project folder
  • Rename App.cs to App.xaml.cs
  • Create a file and name it App.xaml. It should contain:


<?xml version="1.0" encoding="utf-8" ?>
<Application xmlns=http://xamarin.com/schemas/2014/forms
xmlns:x=http://schemas.microsoft.com/winfx/2009/xaml
x:Class="
[YOUR NAMSPACE].App">
</Application>

  • Edit the project (.csproj) file (using Visual Studio or a text editor like Note Pad).
  • Change this:

<Compile Include="App.cs" />


  • To this:

<Compile Include="App.xaml.cs">
<DependentUpon>App.xaml</DependentUpon>
</Compile>

  • Add this ItemGroup section:

<ItemGroup>
<EmbeddedResource Include="App.xaml">
<Generator>MSBuild:UpdateDesignTimeXaml</Generator>
<SubType>Designer</SubType>
</EmbeddedResource>
</ItemGroup>
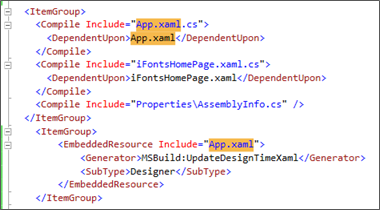
  • Save the .csproj file
  • Reload the project (or reopen the solution)
  • Finally, in your App.xaml.cs file, you should first declare you class partial (in fact, another part is generated during compilation) the App constructor should call InitializeComponent() for your resources to be usable in other xaml files.


public partial App : Application
{

public App()
{
        InitializeComponent() ;


  • You can now define application resources in App.xaml and use them the same way in WPF and Silverlight apps.

Add new item: where is the ContentView (UserControl)?

ContentViews are an interesting xaml objects that are similar to UserControl in WPF/Silverlight. It allows you to define the presentation of one or more objects that you can include in other ContentPages, ListViews and other containers.

In Visual Studio, if you right click a project folder and select Add à New Item, you don't have a ContentView in the list of available items.
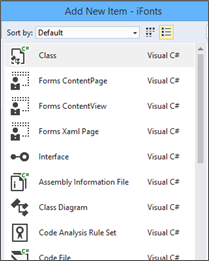
 

How to solve:

  • Select Add a Forms Xaml Page and give it the name you want (here: NewContentView1)
  • Open the xaml file of this new item
    • Change this

            <ContentPage xmlns=http://xamarin.com/schemas/2014/forms

  • To this

            <ContentView xmlns=http://xamarin.com/schemas/2014/forms

  • And, of course, this (end of file) </ContentPage> to this </ContentView>
  • Open the .cs file of this new item
  • Change this

    public partial class NewContentView1 : ContentPage

  • To this

    public partial class NewContentView1 : ContentView


This can also be done by copy / paste files and changing class names…

Craftsmanship: software is J

Files and build action pitfalls

When you add an existent xaml file to your project, it sometime just breaks the project build with many weird errors. The cause is often that the xaml file has been assigned a wrong Build action.

You should check that xaml files are assigned Build Action = Embedded Resource, Do not copy, with Custom tool = MSBuild:UpdateDesignTimeXaml.
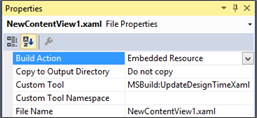


  • Android assets: should be configured with Build Action = AndroidAsset, No copy (unless copy is needed)
  • Android Resources (& drawables): Build Action = AndroidResource, No copy (unless copy is needed)
  • iOS resources: Build Action = BundleResource, No copy (unless copy is needed)
  • WinPhone assets: Build Action = Content, No copy (unless copy is needed)
  • WinPhone resources: Build Action = Embedded Resource, No copy (unless copy is needed)

Don't use custom renderers unless…

One important feature of Xamarin forms is, obviously, to bring your forms to devices' screens. That is done by built-in 'renderers' whose role is to translate the (xamarin) xaml elements attributes to their equivalent in each platform (droid, iphone, win phone…). This translation process is not yet as perfect as we may expect. It is getting better with the progress of xamarin forms versions but, still, not yet perfect.

That sometimes produces discrepancies of graphical design between platforms (control dimensions, alignments, colors… etc.)

Fortunately, Xamarin forms provides the OnPlatform object (xaml markup extension) that allows us to specify per-platform specific values for elements and styles' attributes. And we may also use the Device static class to access information about the current platform on which your application is running and set values accordingly.

Using OnPlatform, for instance, you may define button height on per-platform value:

<OnPlatform x:TypeArguments="x:Double" x:Key="normalButtonHeight"
    Android="44"
iOS="44"
WinPhone="78"/>

Then use it in a Button style:

<Style TargetType="Button">
<Setter Property="HeightRequest"    Value="{StaticResource normalButtonHeight}" />

</Style>


This can also be achieved by different other methods. For instance:

  • Use the Device static class (in the PCL project) to detect and set values according to the current platform on which your application is running
  • Define specific resources (styles / templates…) in the target platform project
  • And, ultimately, you may use a 'custom renderer' (in the target platform project), to handle the graphical attributes of your UI element before it is put on screen.

The advantage of handling things in the PCL project are obvious (Write Once, Run EverywhereJ)… There are situations where this can be impossible or undesirable. In that case specific platform code or resources can be used.

With custom renderers, things are a little different though.

Xamarin framework has a set of built-in renderers for all UI elements. These renderers are evolving relatively quickly (for the better!). When you define your own custom renderer, you in fact derive yours from one existing built-in renderer and will override some of its methods. That puts a new test/maintenance hassle on your project… and, with the evolution of built-in renderers, yours may end up by performing less effectively than the built-in one… (But will still override its features).

So: think twice before going for a custom renderer!


(More tips and pitfall solutions to follow…!)

Xamarin forms: an image source dilemma


As we saw during the first 'inside-look', Xamarin exposes the Image control (or 'View', as you like) with its Source (ImageSource) that can be either a FileImageSource, a StreamImageSource or an UriImageSource.

Most of the samples that talk about how to use Image are delivered with FileImageSource… something like this:

<Image Source="photo.png" />

Or, sometimes:

<Image Source="http://company.com/photo.png" />

Great!... it looks like the Image is quite intelligent to directly know if the source is a FileImageSource or a UriImageSource… mazing work… the guys @Xamarin are quite smart and helpful… right?

Not so fast!

After having some trouble with this (you should expect some in this juvenile environmentJ), I understood something: Many (if not all) samples about Xamarin features are often delivered with the very 'trivial' situation… as they may say: for 'pedagogic' reasons (exactly the same reason we heard in primary/secondary schoolJ)

What if we were 'mature' (if not 'professional') people?... well, apparently, you do it yourself!

In the Image case is also probably accentuated by the fact that the ImageSource is a class whose base is the Element class (which is the grand-grand-parent of the Image class!)

The case

What I had to do with Image was to display an image dynamically generated by a service call. A product image for instance which you can get with an Uri that may look like:

http://mycompany.com/myService.svc?productId=123&thumbnail=1

If you try the somehow trivial cases, you simply put:

<Image Source="http://mycompany.com/myService.svc?productId=123&thumbnail=1" />

That simply 'does not work'! (please don't ask me why J)

Fortunately, we know by other experiences that software is sometimes a craftsmanship process.

I first tried using the StreamImageSource (feeding it with a stream filled up with the bytes coming from the service)… but ended up by asking myself why this object exists (it is not probably totally useless… but it was in my case!)

Image source Binding

As you now know, real life is a little different from schools.

So, as you may imagine: I in fact will not have my Image written like this:

<Image Source="http://mycompany.com/myService.svc?productId=123&thumbnail=1" />

It will rather be written like this:

<Image Source="{Binding ProductImageSource}" />


ProductImageSource property in this case was returning a string containing the address for getting the image. Counting on the Image intelligence for translating this address to an UriImageSource. Which did not work.

The solution (that works… and not only on my machine!)

Let us change the ProductImageSource from a string to its meaning: an ImageSource.


public ImageSource ProductImageSource 
{ 
    Get {    return GetImageUriSource(ProductImageUrl, 5.0);     } 
}


GetImageUriSource, a helper method somewhere (in a static class for instance) can do this work for products or other objects when needed:

public static ImageSourceGetImageUriSource(string strUrl, double cacheDurationMinutes) 
{ 
    if (string.IsNullOrEmpty(strUrl)) 
        return null; 

    // escape the url
    strUrl        = Uri.EscapeUriString(strUrl); 
 

    if(!Uri.IsWellFormedUriString(strUrl, UriKind.RelativeOrAbsolute)) 
        return null; 

    Uri            imgUri        = new Uri(strUrl); 

    return new UriImageSource() 
    { 
        CachingEnabled = true, 
        Uri                 = imgUri, 
        CacheValidity = TimeSpan.FromMinutes(cacheDurationMinutes) 
    }; 
}


That works!

Xamarin forms: elementary – don’t cast!


Many Xamarin users come from the Java environment and are starting with c#.

For those who don't know yet: please don't cast. Use the as operator instead.

Example:
In many situations, your method may seem like this:

void testcast(object img)
{
    Label    label1    = img as Label;    // label1 will simply be null
    Label    label2    = (Label)img;        // you get an InvalidCastException
}


Xamarin forms: a small step for mankind (!), an inside look - I

That is a second post in my series about Xamarin.

My intention is to write about various aspects of Xamarin environment, objects, architectural approaches as well as some recipes concluded by the lessons learnt through a year of intensive work in this platform.


For those who don't know about Xamarin and the Xamarin Forms offer, you may have a look at the (interesting) tale of this true modern adventure… with all the modern panoply of social experience, including unemployment and layoffs!

For a quick summary about Xamarin Forms (which is the ultimate evolution of Xamarin's offer):

Xamarin.Forms

Introduced in Xamarin 3 on May 28, 2014 and allows one to use portable controls subsets that are mapped to native controls of Android, iOS and Windows Phone.

In this post, I will try to explore important objects and mechanisms exposed in various libraries of the product. Knowledge of those is useful and may help for better understanding and usage.

Note: to explore these items, I used Visual Studio Object Browser along with Code map.

Who / What is inside?

At the root of Xamarin.Forms, two foundation objects: The BindableProperty and BindableObject.

The BindableObject (abstract class… we will see some of its genealogy later) exposes:

  • BindingContext which is simply an object
  • BindingContextProperty: a Bindable property (bounces back to the BindingContext)
  • And several events: BindingContextChanged, PropertyChanged and PropertyChanging.


The BindableProperty (a sealed class), exposes the following read-only properties (initialized, naturally, by several public constructors):

  • DecalringType: System.Type
  • DefaultBindingMode: BindingMode enumeration
  • DefaultValue: object
  • IsReadOnly: bool
  • PropertyName: string
  • and ReturnType: System.Type


Yes, with such an object, you are ready to sail far Overseas!


BindableObject and BindableProperty relationship

As we may expect, BindableObject makes (many) calls to BindableProperty (presumably through its BindablePropertyContext). That is a long subject that merits a specific post later. For now, let us have a look at the call mesh in the following illustration:

Exploring Xamarin Forms objects' genealogy

Who derives from BindableObject?

BindabelObject is the base class for WebViewSource à TriggerBase à Behavior à ColumnDefinition à RowDefinition à TableSectionView (what is this?J) à AND the Element!

The Element (abstract class) is the base class for à Application (!) à VisualElement (which is itself the parent of View… see below) à ImageSource (I now better understand my issues with thisJ) à GestureRecognizer à BaseMenuItem


Some debatable architectural aspects seem worthy for a note:

  • The Element is the base class of VisualElement.
  • In the same time, it exposes a member (ParentView) which is a VisualEement!


I remember, I was threatened to be fired for having used such relationshipJ. That is to say I am not fundamentally against… but let us admit that such relationship may – at least – restrain the evolution of both the parent and derived objects.

  • As you see in the figure, the ImageSource object derives from Element.
  • The Image (deriving from à View, itself deriving from à VisualElement, itself deriving from à Element)… has a member 'Source' which is an Element!

I think, at this point, I would have been definitely fired if I did something like thatJ.

But why not! It only becomes just a more risky game!

The VisualElement carrefour!

VisualElement object exposes properties needed for on-screen rendering: AnchorX / Y, BackgroundColor, Bounds, Height (get) / HeightRequest, Width (get) / WidthRequest / Minimum H/W Request, Opacity, Style, Rotation… etc. It also implements Interfaces that compose the infrastructure needed for rendering the object on each platform through the platform VisualElementRenderer<T> (where T: VisualElement).


The VisualElement is the base class for two objects à Page and the View.

To avoid terminology confusions (Both View and Page are translated (rendered), in Win Phone, as a Panel (Which is a FrameworkElement)), the ViewContent (derives from View) is, approximately, what is called 'UserControl' in the Windows world. A ContentPage (derives from Page), with the same relative approximation, is what we call a Window.

To better resolve (and understand) such objects associations between Xamarin core library and a specific platform, you may use Visual Studio Objet Browser (or other assembly browser) to have a look at the renderer of the Xamarin object for the platform.

The following illustrates, for instance, the View renderer object tree for the Win Phone platform.

Here, it is the Image renderer on Android platform

The Page object

The page is the root object of several Types: à The ContentPage, à the NavigationPage, à the MultiPage<T> and the MatserPage.

I personally expected the Page to be a container (of Views) and that the Content property is one of the Page Object… that is not the case (deceiving ignoranceJ).


  • It is the ContentPage which exposes the Content property.
  • The NavigationPage exposes the (get/set) CurrentPage member property (which is a Page… so if you would like to get its 'Content', you will have to cast it to a 'ContentPage' with the risks implied in such a cast (life is dangerous!)
  • With the MultiPage<T> (where T: Page) you again have a (get/set) CurrentPage property that returns a T (of Type Page)… you now know how to access something useful inside!
  • The MasterDetail, as you may expect, exposes a Master and Detail (each of Type Page)


The View object

The View is the base class of à mostly all controls and layout root classes


The View in everyday life

When you write <Button> in xaml (or when you write new Button(); in code), you are creating an object deriving from the View object. At runtime, your Button will be handed over to the Xamarin rendering engine to put the button on the target device's screen according to values you specified for properties of that object.


Note:

Not all properties are correctly transmitted or rendered on target devices (at least in the current version of Xamarin.Forms). In fact, for our Button example, some properties are not suitably tailored for all target platforms. For instance, the BorderRadius property of a Xamarin Button is not translated into anything on Win Phone.


The ContentView

The StackLayout example

Let us take another container control deriving from the View object: the (famous) StackLayout.

StackLayout derives from ß Layout<T>. (It is a Layout<View>).


What Xamarin documentation says about StackLayout:

Summary:

A Xamarin.Forms.Layout`1 that positions child elements in a single line which can be oriented vertically or horizontally.

Remarks:

Because StackLayout layouts override the bounds on their child elements, application developers should not set bounds on them.


It exposes two properties (Both are bindable):

  • Orientation (StackOrientation enumeration: Horizontal / Vertical)
  • Spacing (double): the spacing between the layout elements.


Inherited properties

  • It inherits the Children (an IList<View>) property from its base class ß Layout<T> itself implementing the IViewContainer<View> Interface.
  • Padding (Thickness), inherited from Layout
  • IsClippedToBounds (bool), inherited from ß Layout: does the container clip its children to its own bounds (see documentation remark above)
  • HorizontalOptions, VerticalOptions (LayoutOptions) and GestureRecognizers (IList<GestureRecognizer>) are inherited from ß View.
  • Deeper in the genealogy, StackLayout inherits properties of the VisualElement
    • Then from Element
      • And finally from the BindableObject (the foundation object)


So, when we are using a StackLayout, we are using an IViewContainer, a Layout, a VisualElement, an Element and, ultimately, using a BindableObject.

And it is often important to remember this in order to make the most effective use of an object.

The Image example

As I mentioned above, Image is another useful example. I got confused while trying to manipulate its ImageSource property.

As the name suggests, I thought that ImageSource is a 'VisualElement'… It IS NOT J. It is an Element. It has several Load methods (from File, from Stream, from Uri…) and one (get only) CancellationTokeSource property… which is described in Xamarin documentation as: Used by inheritors to implement cancellable loads). Oddly enough, none of the derived classes delivered by Xamarin (FileImageSource, UriImageSource…) make use of this Cancellation token!

Being an Element (and thus, a BindableObject), ImageSource has few properties that you can set in a PCL project (xaml / code). That maybe one of the reasons why many questions about this object are on Xamarin developers forums!

That also makes of ImageSource a good recipe area that we will explore in a later post.


In a next post, I will explore the road it takes from your xaml (or shared code) to device screen… a long journey!

Xamarin forms: a small step for mankind!

My friends at UXDivers are doing a great job in bringing Xamarin Forms into the developer's desktop with nicely crafted design and some extra facilities like their Gorilla player which allows you to instantly view your xaml output at design-time.

UXDivers' Grial U.KIT also exposes a wide range of controls and design ideas that enriches applications with ready-made and adaptable Xamarin Forms elements.

Handling fonts with Xamarin Forms

One of the interesting features of Grial is using awesome web font to create attractive buttons design with a minimal resource cost.

As fonts seem to be one interesting resource for applications and, in the same time, are handled differently in target platforms (Android, iOS and Win Phone), I did a small dive into the subject.

My conclusions so far are quite simple:

  • To use a font, in Xamarin Forms solution, you should first get its definition file (preferably a .ttf)
  • According to the platform specific project, you should place that file:
    • For Android project: in the Assets folder. Build action = AndroidAsset (no copy)
    • For iOS project: in the Resources folder. Build action = Bundled resource (no copy). The name of the font file should also be included in the application's info.plist file. Example:

      <key>UIAppFonts</key>
          <array>
              <string>Novecentowide-Bold.ttf</string>
          </array>
       

    • For Window Phone project: in the Assets folder (or sub folder of it). Build action = Content (no copy)
  • For Android: you need a custom renderer in order to apply the selected font
  • For iOS and WP: the font family name is all what you need to apply the font


Styles and Font family naming

As font family naming conventions vary for each platform, the ideal way is to use the Xamarin Forms OnPlatform to define this.

In this example we create an on platform string resource (in App.xaml) with the key "fontNovecentoName":


<OnPlatform x:TypeArguments="x:String"
    Android="Novecentowide-Bold.otf"
    iOS="Novecentowide-Bold"
    WinPhone="./Assets/Fonts/Novecentowide-Bold.otf#Novecento"
    x:Key="fontNovecentoName"/>

 We can then refer to this font family name in a Label style, like in the following:


<Style TargetType="Label" x:Key="labelNovecento">
    <Setter Property="FontFamily"    Value="{StaticResource fontNovecentoName}" />
    <Setter Property="FontSize"        Value="16" />
</Style>


Once we defined this style as an application resource, we can use it anywhere in our xaml views to create labels using the font:

<Label Style="{StaticResource labelNovecento}" Text="This should show Novencento font" />


That label will directly show on iOS and Windows Phone with no extra work.

For Android, we should use a 'Custom renderer' (deriving from Xamarin.Forms LabelRenderer) whose role is to extract the font family name from the xaml code and try to apply it to the target label.


Android custom renderer

'Custom renderers' is a vast subject. To summarize: the role of a custom renderer is to do the job of translating xaml instructions into on-screen graphical items according to each platform constraints. There is a Xamarin built-in renderer for each type of Xamarin Forms controls (Views). If you need an extra rendering job for a control, you create your own renderer inheriting the built-in one for the control… and you override one or more of that built-in renderer's methods to add your specific functionality.


For our subject, we need to create a custom Label renderer in Android to apply the desired font if any is specified.

Sample code:


// we should export our renderer in order to be called
[assembly: ExportRenderer (typeof (Label), typeof (iFontLabelRenderer_Android))]

namespace iFonts.Droid
{
   public class iFontLabelRenderer_Android : LabelRenderer
   {
     // override the base’s OnElementChanged
     protected override void OnElementChanged (ElementChangedEventArgs<Label> e)
     {
        base.OnElementChanged (e);

        var label      = Control as TextView;
        var  xfControl  = Element as Label;

        // try to find the font family name
        string     fontName= xfControl == null ? null : xfControl.FontFamily;

        if(string.IsNullOrEmpty(fontName))
           return;

        try
        {
           // try to create and apply the font
           Typeface font = Typeface.CreateFromAsset (Forms.Context.Assets, fontName);
           label.Typeface = font;
        }
        catch (Exception)
        {
           // throw exception if you find this useful
           //throw;
        }
     }
   }
}


Download the sample app. iFonts.zip (944.41 kb)

Deep Zoom follow-up - optimizing displayed (KML) polygon points

DeepZoom has been one of the most inspiring projects/technologies in last years. Its approach is now extensively used in various domains, notably in mapping applications.

I think DeepZoom approach still have more application areas to explore.

In this article, I will explore one question where the DeepZoom approach can be quite useful.

KML Polygons

KML (Keyhole Markup Language) is an XML-notation-based 'language' now widely used to describe geographic data. Among many types of data, KML includes Polygons, which describe point locations on a map. A polygon may, for instance describe the contour of political frontiers of a country or a seashore…, which may thus contain a large number of point-coordinates.

As each of the polygon's points may be associated with more or less large data objects, processing the polygon information may become a challenging operation either on a server or on a client machine. Reducing manipulated polygon data size and required processing efforts is thus an important performance question.

One of the techniques often used is to compress (zip) the KML transmitted files' data (to produce .kmz files instead of .kml). But there should be a better approach in simply transferring (or processing) only significant point's data.


Zoom level and view port

When we view or display a map, we in fact view in a zoom level. According to this zoom level, two points may have a significant distance or be confused into one same point.

The following figures illustrate this:

  • At the first zoom level, point 1 and point 2 are clearly distinct
  • The more we zoom-out, the less distinctive they become
  • Until both can be considered as one same point

Conclusion: according to the zoom-level, we may transfer (or manipulate/process) only one of those points instead of both.


Zoom level1

Zoom-out1

Zoom-out2


This can also be illustrated by the DeepZoom 'pyramid' approach:


A map is also viewed into a 'View Port' (the window through which we view the map).

For the two points of the previous example, at certain zoom-in level (or view port coordinates change), one (or both) of them may be located out of the view port.


Another conclusion: we don't need to transfer (or manipulate/process) polygon points which may be located outside of the current view port.

The delivered code sample

The downloadable code includes the data of a polygon composed of a large array of points.

The sample uses several parameters to determine which points to be considered for transfer or processing:

  • The view port coordinates: used to select only points inside the view port
  • The zoom level: associated with a ratio used to compare the significance of points' coordinates variations


The ZoomPortView object exposes few properties: a Name, a ZoomRatio, TopLeft and BottomRight points (Width and Height are calculated according to those points' coordinates).


The ZoomPolygon object exposes few properties: a list of polygon's Points. For the sake of current demonstration, the object also exposes PointsOutOfPortView which is a list of points that are out of the current port view.

ZoomPolygon class offers a static method which parses an array of points according to a given port view, returning the related new ZoomPolygon object.


public static ZoomPolygon Parse(Point[] points, ZoomPortView portView)
{
    ZoomPolygon        polygon        = new ZoomPolygon(portView);
    ObservableCollection<Point> pointList = new ObservableCollection<Point>();
    ObservableCollection<Point> pointsOutPortView = new ObservableCollection<Point>();
    double    zoomRatio = portView.ZoomRatio;
 
    double maxX    = portView.Width,
            maxY    = portView.Height;
    Point    point,
            last    = new Point();
 
    for(int index = 0; index< points.Length; index++)
    {
        point = points[index];
 
        if( ! portView.IsPointInPortview(point))
        {
            pointsOutPortView.Add(point);
            goto next_point;
        }
 
        if (pointList.Count <= 0)
        {
            pointList.Add(point);
            goto next_point;
        }
 
        if( Math.Abs( (point.X - last.X) / maxX) >= zoomRatio
            || Math.Abs( (point.Y - last.Y) / maxY) >= zoomRatio)
            pointList.Add(point);
next_point:
        last = point;
    }
 
    polygon.Points = pointList;
    polygon.PointsOutOfPortView = pointsOutPortView;
    return polygon;
}


Note: the code above can of course be more compact using Linq. This version seems more illustrative of the logic to include / exclude polygon points.


Sample screen shots


Download the sample code

KmlOptimizerSample.zip (1.28 mb)

Acknowledgement

Thanks to all my friends at Thomson Reuters' iMap Project with whom I learnt much about kml and maps in general: Benoît, Florent, Catalin, Christophe, Ronan, John, Geffe, Calum…

Choices in a logical tree view – WPF sample

Using check boxes in TreeView control is a handy way for presenting choices in their logical tree-like structure.

In real life, though, choices can be a mix of inclusive (check-box) and exclusive (radio-button) options.

I expose here a solution for using that mix of option types in one same tree view.

The problem

The problem is divided into three main subjects:

  • How to use a mix of checkbox / radio button nodes in the same tree view control
  • How to get a radio button to be toggled from checked to unchecked status: Checkboxes are, 'naturally', able to be toggled from checked to unchecked status. This is not the case for Radio buttons. The result is that when you use radio button in a tree view, you will be able to check it but not to get it uncheck!
  • How to handle exclusive choices selection. That is when an exclusive option gets selected (checked), for instance,we must unselect all other exclusive sibling options.


To solve the first question, we will use:

  • A tree node object which indicates its option type (exclusive / inclusive)
  • Hierarchical control templates for each choice type
  • A template selector which will select the correct template according to the node object choice type


To solve the second, we will simply create a new Toggled Radio Button (which derives from RadioButton) and get this new object handle the Click event to toggle its selection status.


public class RadioToggleButton : RadioButton
{
    protected override void OnClick()
    {
        IsChecked = !IsChecked;
    }
}


The third question will be solved by implementing the required behaviors within our special tree node object.


The TreeNode object

The TreeNode object exposes few properties:

  • A Title
  • A Parent node (TreeNode)
  • A list of Children (List of TreeNode items)
  • A boolean flag which indicates if the node represents an exclusive choice option
  • A boolean flag which indicates if the node is selected

Through these properties, TreeNode object can expose other properties like its Root node, the First exclusive parent or descendant… etc.


The TreeNode Hierarchical data template


<UserControl.Resources>
…
…
    <!-- hierarchical template for checkbox treeview items -->
    <HierarchicalDataTemplate x:Key="checkBoxTemplate" 
        DataType="{x:Type app:TreeNode}"
        ItemsSource="{Binding Children}">
        <StackPanel Orientation="Horizontal">
            <CheckBox Focusable="False"
                VerticalAlignment="Center"
                IsChecked="{Binding IsSelected, Mode=TwoWay}" />
            <TextBlock Text="{Binding Title}" />
        </StackPanel>
    </HierarchicalDataTemplate>
 
    <!-- hierarchical template for (toggled) radio buttons treeview items -->
    <HierarchicalDataTemplate x:Key="radioButtonTemplate" 
            DataType="{x:Type app:TreeNode}"
            ItemsSource="{Binding Children}">
        <StackPanel Orientation="Horizontal">
            <ctrl:RadioToggleButton Focusable="False"
            VerticalAlignment="Center"
            IsChecked="{Binding IsSelected, Mode=TwoWay}" />
            <TextBlock Text="{Binding Title}" Margin="4, 1, 0, 0" />
        </StackPanel>
    </HierarchicalDataTemplate>
</UserControl.Resources>


The TreeView node's Item template selector


public class TreeNodeXTemplateSelector : DataTemplateSelector
{
    public override DataTemplate SelectTemplate(
                object item, DependencyObject container)
    {
        FrameworkElement    element = container    as FrameworkElement;
        TreeNode    node    = item  as TreeNode;
 
        if (element != null && node != null)
        {
            if (node.IsExclusive)
                return element.FindResource("radioButtonTemplate")
                                 as HierarchicalDataTemplate;
            return element.FindResource("checkBoxTemplate")
                                as HierarchicalDataTemplate;
        }
        return null;
    }
}


We can now use an ItemTemplateSelector to tell the Tree view control to select the adequate data template for each item according the tree node choice selection type (exclusive / inclusive)


<UserControl.Resources>
    <app:TreeNodeXTemplateSelector	x:Key="templateSelector" />
    …
    …
</UserControl.Resources>


<TreeView x:Name="treeview1" ItemsSource="{Binding Root.Children}"
                  ItemTemplateSelector="{StaticResource templateSelector}"/>


Exclusive node selection behavior

TreeNode selection behavior can be summarized as follows:

  • If the node is inclusive: do nothing (just set the selected flag)
  • If the node is exclusive (and selected):
    • Unselect all exclusive siblings (siblings = Parent's Children)
    • Select all inclusive child nodes
    • Select the first exclusive child node if any


public void UpdateSelection()
{
    if(! _isExclusive)
        return;
 
    if(_isSelected == true)
    {
        UnSelectSiblings();
    }
 
    SelectChildren(_isSelected);
}


protected void SelectChildren(bool selected)
{
    if(! selected)
    {
        UnSelectChildren();
        return;
    }
 
    TreeNode firstEx = FirstExclusiveChild;
 
    if(firstEx != null)
        firstEx.IsSelected = selected;
 
    foreach(TreeNode node in _children)
    {
        if(node.IsExclusive)
            continue;
 
        node.SetSelection(value: selected, updateChildren: true);
    }
}


Sample screenshot


Download the sample code TreeViewRadioAndCheckButtons.zip (67.88 kb)

Meta-models: towards a universal dependency injection framework

Intro

I joined an interesting presentation today about unit tests. Part of the presentation was related to dependency injection usage for unit testing. That brought to my mind again the benefits of meta-models.

The problem

Unit testing often faces the problem of having to instantiate objects that may impact the test itself or simply make the test impossible.

A sound example of this is when the method to be tested requires the instantiation of an object requiring, for instance, a database connection.

In this schema, we have 3 actors

  • The function
  • The caller
  • The object (SomeObject) which cannot be instantiated.


Traditional recipe

One, now traditional, recipe is to use an Interface (instead of the specific object) as a function parameter. And, according to the context, instantiate and use an object that implements the defined interface. The figure below illustrates this.


Good solution… a little acrobatic, but OK… good.


A problem, though. We now have 6 actors (to code and maintain):

  • The Function
  • The caller
  • The original 'true' object (SomeObject)
  • The Interface
  • The interface implementations (=2)!


On the other hand, testing a function may also need to instantiate a 'true' object context. In which case, we would have to rewrite (and recompileJ) our test code to instantiate a 'true' implementation when required.

A third point: in this solution, we defined the Interface to represent an abstraction of the original object. What if the original object itself was, for instance, a database record? This would then introduce a new actor in our playgroundJ


As Bjarne Stroustrup puts it:

"Any verbose and tedious solution is error-prone because programmers get bored" J


Meta-models may be a better way

In the current case, meta-models (see my previous posts) can be used to more simply describe all actors (object structures / methods / properties…).

An illustration:


Reminder: meta-models are closely related and enforced by Reflection (assemblies' meta-data). Through meta-models AND Reflection (namespace System.Reflection) developers can gain more flexibility to create versatile and scalable software.


In our present case, meta-models not only expose less actors to code and maintain, but also lower the complexity level of involved actors (for instance: maintaining database records instead of hard coding implementation).


The main goal for this approach is to ultimately write fewer universal methods to invoke and instantiate any object!

Will try to deliver a code sample in a future post. In the meantime, you may download meta-model sample code here!

A dive into the undocumented TFS meta-model – Part I

TFS… introduction to this series


Microsoft TFS (Team Foundation Server… recently renamed to ALM: Application Lifecycle Management) is a great project management platform.

TFS is built on meta-model abstractions (that were first seen, in Microsoft's products, in SharePoint).

TFS, like SharePoint, is composed of several software components which operate around several databases: the configuration database and one or more content databases.

Configuration and content databases' elements (tables, views, functions, stored procedures… etc.) represent the meta-models (schemas and business logic for each related feature) which govern and control much of the software components' behaviors.

TFS is often presented as a software project management solution. In my view, this seems a little reductive of its value. Because TFS features truly span a much larger project management scope.

Many useful literatures have been written about TFS: its features, usage, guidance, troubleshooting… etc. Few have enlightened its meta-model structures and, as of my knowledge, none has put some clear light about its (undocumented) databases' structures. That is what I will try to do in this series, more to value TFS abstractions than to nude its internal mechanics. And also to enforce, again, the meta-model approach as a rational basis for software solutions.


TFS logical architecture


For its contents, TFS maintains a database per project-collection.

Each collection may contain one or more projects. And each project can be managed according to a selected methodology (Agile / Scrum / CMMI… etc.). In fact, TFS applies and operates the selected methodology through the provided methodology project management template. Ultimately, this means you can build your own methodology and use it to manage your project with TFS. All what you need is to provide the desired methodology template.

Managing a project with TFS consists of recording and following-up specific Work items (defined by the methodology template)… those can be items like: Tasks, Bugs, Change requests, User story… etc.

As TFS was initially brewed to manage software projects, a common item in each project is the Source control repository which helps developers to maintain their source code versions and branches in a very efficient architecture composed of 'change sets'.


To discover and figure out its components' data and their required behaviors, TFS uses a configuration database. A first look at the configuration database will be the subject of this first article in the series.


The configuration database


Like SharePoint, TFS databases are delivered without documentation or relational diagrams. They simply don't contain any explicit Foreign-keys or relationships. Whatever the reason behind this choice, that seems a little surprising of a product whose main aim is projects' transparency and documentationJ.

That said, to discover, understand and correctly interpret the role of each TFS database item and their inter-relationships you should do a deep dive and be armed with some patience and empiric methods!


Hosts and processes


Let's have a look at three important tables:

  • tbl_ServiceHost contains the list of services' host information. This includes the item's name, the database connection string (when relevant), the Virtual directory and Resource directory…
  • tbl_ServiceHostProcess contains information about current processes. Machine name, Process name, Identity under which the process is running, start time…
  • tbl_ServiceHostInstance contains the list of processes' instances per host (Process Id / Host Id / Start time).


In my case, the table tbl_ServiceHost contained 3 entries for:

  • Team Foundation: root item (parentless… see diagram ParentHostId column). Connected to the configuration database.
  • Two child entries each for one of my TFS Project collections:
    • Default collection.
    • Training collection.


The above relational schema allows us to query the tables and obtain results like the following about current running services:


SELECT TOP (100) PERCENT
svcHost.Name         AS host,
svcHost.VirtualDirectory,
svcHost.ConnectionString,
process.MachineName    AS machine,
process.ProcessName,
process.StartTime


FROM dbo.tbl_ServiceHostInstance AS instance INNER JOIN
dbo.tbl_ServiceHost AS svcHost ON instance.HostId = svcHost.HostId LEFT OUTER JOIN
dbo.tbl_ServiceHostProcess AS process ON instance.ProcessId = process.ProcessId LEFT OUTER JOIN
dbo.tbl_ServiceHost AS hostParent ON svcHost.ParentHostId = hostParent.HostId

ORDER BY process.StartTime DESC, hostParent.Name, host


Sample results

host 

VirtualDirectory 

ConnectionString 

machine

ProcessName 

StartTime 

TEAM FOUNDATION 

NULL 

Data Source= hp10\SqlTfs;Initial Catalog=Tfs_Configuration;Integrated Security=True

HP10 

w3wp.exe 

2012-05-21 20:18:09.997 

DefaultCollection 

~/DefaultCollection/ 

Data Source=hp10\sqltfs;Initial Catalog=tfs_defaultcollection;Integrated Security=True 

HP10 

w3wp.exe 

2012-05-21 20:18:09.997 

Training collection 

~/Training collection/ 

Data Source=hp10\SqlTfs;Initial Catalog="Tfs_Training collection";Integrated Security=True

HP10 

w3wp.exe 

2012-05-21 20:18:09.997 

TEAM FOUNDATION 

NULL 

Data Source=hp10\SqlTfs;Initial Catalog=Tfs_Configuration;Integrated Security=True 

HP10 

TfsJobAgent.exe 

2012-05-21 06:51:37.870 

DefaultCollection 

~/DefaultCollection/ 

Data Source=hp10\sqltfs;Initial Catalog=tfs_defaultcollection;Integrated Security=True 

HP10 

TfsJobAgent.exe 

2012-05-21 06:51:37.870 

Training collection 

~/Training collection/ 

Data Source=hp10\SqlTfs;Initial Catalog="Tfs_Training collection";Integrated Security=True

HP10 

TfsJobAgent.exe 

2012-05-21 06:51:37.870 


Ressources and services

Again, let's follow up the following tables:

  • tbl_CatalogResourceType stores a list of resource types. Like: 'Machine', 'Infrastructure Root', 'Project Server', 'Team Foundation Project Collection Database'… etc. Here is some sample entries:

Identifier 

DisplayName 

Description 

9FB288AE-9D94-40CB-B5E7-0EFC3FE3599F 

Default location for team project portals 

By default, each team project Web site will be a sub-site of this location.

0584A4A2-475B-460E-A7AC-10C28951518F 

Machine 

A machine that exists as part of the TFS deployment. 

14F04669-6779-42D5-8975-184B93650C83 

Infrastructure Root 

The root of the catalog tree that describes the physical makeup of the TFS deployment.

1B6B5931-69F6-4C53-90A0-220B177353B7 

Team Foundation Project Collection Database 

The database that houses the information for a Team Foundation Project Collection. 

526301DE-F821-48C8-ABBD-3430DC7946D3 

Team Foundation Configuration Database

The database that houses the information for a Team Foundation Application Instance. 

289DD275-CECA-4698-8042-38D2E86FC682 

Project Server 

Project Server Information 

3DADD190-40E6-4FC1-A306-4906713C87CE 

SharePoint Web Application 

A SharePoint Web application that has been configured to support team project portals.

3C856555-8737-48B6-8B61-4B24DB7FEB15 

Test Controller 

This is a test controller type in Catalog Service. 

26338D9E-D437-44AA-91F2-55880A328B54 

Team Project Collection 

A Team Project Collection that exists within the TFS deployment.

450901B6-B528-4863-9876-5BD3927DF467 

Project Portal 

A Web site or SharePoint site that provides a portal for a team project. 

15DA1594-45F5-47D4-AE52-78F16E67EB1E 

Process Guidance 

A Web site or SharePoint library that provides process guidance for a team project.

47FA57A4-8157-4FB5-9A64-A7A4954BD284 

Team Web Access 

Team Web Access Location 

48577A4A-801E-412C-B8AE-CF7EF3529616 

Team Project 

A Team Project that exists within the TFS deployment. 


  • tbl_CatalogResource stores resources (each referring to one of the types in the above tbl_CatalogResourceType table. Sample entries:


Identifier 

ResourceType 

DisplayName 

Description 

7462A882-741B-4F91-885F-1405A22256DF 

1B6B5931-69F6-4C53-90A0-220B177353B7 

Tfs_Training collection


C5CD36C5-8373-4BF7-B3FA-16199DAFF106 

48577A4A-801E-412C-B8AE-CF7EF3529616 

cmmi project 

cmmi training project 

16480162-C502-4197-872A-4DDDFE49BA90 

1B6B5931-69F6-4C53-90A0-220B177353B7 

tfs_defaultcollection 


DCC270E7-6EC7-45BF-A827-53BBB5386606

14F04669-6779-42D5-8975-184B93650C83 

Infrastructure Root 

The root of the catalog tree that describes the physical makeup of the TFS deployment. 

2F8C7D1C-EB1F-4058-B34D-60FA2F6CA7DC 

48577A4A-801E-412C-B8AE-CF7EF3529616 

Agile project 


D7121DA7-3E32-49C3-BCB1-68C83C4383B7

47FA57A4-8157-4FB5-9A64-A7A4954BD284 

Team Web Access 


4B812279-A7A6-4A8A-92A4-7AA208589FEB 

EB1E0B3B-FAA1-49D2-931A-FDC373682BA5 

SQLTFS 


F69EFD2B-51C6-461B-9E49-8089DF86C9A3 

0584A4A2-475B-460E-A7AC-10C28951518F 

hp10 


5242DBFC-06C8-4CAD-A27B-99212BEEE999

526301DE-F821-48C8-ABBD-3430DC7946D3 

Tfs_Configuration 


713FF18A-E0E8-4192-A7B9-A0900F50A5BC 

26338D9E-D437-44AA-91F2-55880A328B54 

DefaultCollection 


  • tbl_ServiceDefinition stores a list of predefined services (classes) and the web access page for each. Sample entries (among other things, you may note curly braces which are place holders for some url parameters in the RelativePath column):


ServiceType 

Identifier 

DisplayName 

RelativePath 

AdministrationService 

C18D6E34-68E8-40D2-A619-E7477558976E

Administration Service 

/TeamFoundation/Administration/v3.0/AdministrationService.asmx 

Annotate 

74B15E02-0AC2-414F-A9B9-30268659D3B5 

Team Web Access (Annotate) 

/web/ann.aspx 

AnnotateSourceControlItem

D271E722-C261-4BC2-B0F7-1C8A9E13F907 

Team Web Access (AnnotateSourceControlItem) 

/web/ann.aspx?pcguid={projectCollectionGuid}&path={itemPath}&cs={itemChangeset} 

CatalogService 

C2F9106F-127A-45B7-B0A3-E0AD8239A2A7 

Catalog Service 

/TeamFoundation/Administration/v3.0/CatalogService.asmx

ChangesetDetail 

D40EF625-CCA7-4E73-B9EC-86CBE1534CE0 

Team Web Access (ChangesetDetail) 

/web/cs.aspx 

CreateWorkItem 

14CD69C6-88F9-4C8C-A259-D2441D77D1AF

Team Web Access (CreateWorkItem) 

/web/wi.aspx?puri={projectUri}&wit={workItemType} 

Difference 

2B84D900-1F08-486C-9C47-0E6AF371D03C 

Team Web Access (Difference) 

/web/diff.aspx 

Eventing 

C424AE04-8C6F-4516-8B2D-238FFFCA3081 

Event Service 

/TeamFoundation/Administration/v3.0/EventService.asmx

IdentityManagementService 

3DE26348-00BE-4B82-8E4A-E5AD004CFECD 

Identity Management Service 

/TeamFoundation/Administration/v3.0/IdentityManagementService.asmx 

JobService 

DA1C0184-14FE-4E13-B7FC-6EAA07D84BE8 

TFS Background Job Service 

/TeamFoundation/Administration/v3.0/JobService.asmx 


  • tbl_CatalogServiceReference stores per-resource services' entries. (Resource Identifier / Service Identifier…).


ResourceIdentifier 

AssociationKey 

ServiceIdentifier 

ServiceType 

D7121DA7-3E32-49C3-BCB1-68C83C4383B7 

ChangesetDetail 

D40EF625-CCA7-4E73-B9EC-86CBE1534CE0

ChangesetDetail 

D7121DA7-3E32-49C3-BCB1-68C83C4383B7 

CreateWorkItem 

14CD69C6-88F9-4C8C-A259-D2441D77D1AF 

CreateWorkItem 

D7121DA7-3E32-49C3-BCB1-68C83C4383B7 

Difference 

2B84D900-1F08-486C-9C47-0E6AF371D03C 

Difference 

D7121DA7-3E32-49C3-BCB1-68C83C4383B7

DiffSourceControlItems 

5E91C4DA-0013-4EBB-943D-CC77F5ADB82D 

DiffSourceControlItems 

D7121DA7-3E32-49C3-BCB1-68C83C4383B7 

DiffSourceControlShelvedItem 

4C81A44D-67AB-4D23-9CBE-339C9102993B 

DiffSourceControlShelvedItem 

D7121DA7-3E32-49C3-BCB1-68C83C4383B7 

ExploreSourceControlPath

AC0770BC-1DD6-4B8E-A811-5A03690DF44F 

ExploreSourceControlPath 

D7121DA7-3E32-49C3-BCB1-68C83C4383B7 

Home 

0F9CED5D-89F9-4743-BAB8-FA511FF09A8C 

TSWAHome 


This allows us to query the services in a way similar to the following:

SELECT resType.DisplayName AS ResourceType,
svc.DisplayName AS Service,
svc.Description AS serviceDescription
FROM dbo.tbl_ServiceDefinition AS svc INNER JOIN
dbo.tbl_CatalogServiceReference AS svcRef ON svc.Identifier = svcRef.ServiceIdentifier
INNER JOIN
dbo.tbl_CatalogResource AS Res ON svcRef.ResourceIdentifier = Res.Identifier
INNER JOIN
dbo.tbl_CatalogResourceType AS resType ON Res.ResourceType = resType.Identifier


Sample results:

ResourceType

Service

serviceDescription

Team Web Access

Team Web Access (Annotate)


Team Web Access

Team Web Access (AnnotateSourceControlItem)


Team Web Access

Team Web Access (ChangesetDetail)


Team Web Access

Team Web Access (CreateWorkItem)


Team Web Access

Team Web Access (Difference)


Team Web Access

Team Web Access (DiffSourceControlItems)


Team Web Access

Team Web Access (DiffSourceControlShelvedItem)


Team Web Access

Team Web Access (DiffSourceControlShelvedItem)


Team Web Access

Team Web Access (ExploreSourceControlPath)


Team Project Collection

Location Service

Location Service for Visual Studio Team Foundation Server.

Team Project Collection

Location Service

Location Service for Visual Studio Team Foundation Server.

Team Foundation Server Instance

Location Service

Location Service for Visual Studio Team Foundation Server.

Team Web Access

Team Web Access (OpenWorkItem)


More about TFS meta-models in following posts!

WPF and a ComboBox dilemma (again!)

Sometime ago, I discussed a ComboBox mouse scroll issue in Silverlight. I, again, had a new problem with the ComboBox control… this time in a WPF application.

The ItemsSource update problem

In my case, I had a ComboBox whose ItemsSource was bound to a list of items which was updated dynamically, and its SelectedItem bound to one item of the list. The problem was that the ComboBox was correctly updating the SelectedItem, while the drop-down list continued to display the older list of items! ... Here is a sample illustration:


Figure 1: This is the first context:


Figure 2: The item list changed… the ComboBox correctly displays the selected item (2.476563)… which doesn’t exist at all in the items list. The drop-down list still displays the old items list!


Such odd situations make you feel that either there should be an error somewhere in your code… or that the CombBox itself is a control that you should reinvent yourself!


Check your code!

Here is my Xaml code… that really seems so ‘standard’


<ComboBox x:Name="combobox_rates"
    ItemsSource="{Binding Combinations, Mode=OneWay}"
    SelectionChanged="combobox_rates_SelectionChanged"
    Height="24"
    Width="280"
    ItemTemplate="{DynamicResource combi_list_template}"
    SelectedItem="{Binding Path=SelectedCombination}" />

According to someone advice, let-s add a IsSynchronizedWithCurrentItem=”True”:


<ComboBox x:Name="combobox_rates"
    IsSynchronizedWithCurrentItem="True"
    

Desperately, that doesn’t solve the problem!
Another advice: Bind the ItemsSource to an ObservableCollection<T> (instead of a List<T>): nothing changes…
A third one: add an UpdateSourceTrigger=PropertyChanged to the Binding… let’s just try

ItemsSource="{Binding Combinations, Mode=OneWay, UpdateSourceTrigger=PropertyChanged}"


The solution

Still, we didn’t try this… let’s use the IsAsync Binding attribute:

ItemsSource="{Binding Combinations, IsAsync=True, Mode=OneWay}"

Oh… that seems to work great!
Is sofware development a Science, an Art, or Craftsmanship?!