Intro
Xamarin approach is, without doubt, a great innovation in that it allows developers to cross platform barriers by using one same programming language. This great work started by Ximian's Mono implementation of the .NET framework on Linux. And, thus, by the .NET framework itself!
Extending Mono to be a cross platform mobile framework is a great effort and a compelling expression of the need to normalize the software development process beyond commercial competitions, ultimately for the benefit of all businesses and individuals.
Well… that is about a general view of 'what it is' and why we may use it:)
Now, to start using it is a slightly another question that often needs some craftsmanship skills and pragmatic solutions for elementary problems. Don't expect it to be that easy!
One reason for this is that Xamarin development environment is still immature and lacks many features. Its integration with Visual Studio is even too rudimentary to fulfill some usual tasks (adding a 'new item' to a project is often a tedious process… no xaml design space… Intellisense is too basic, when it works at all!). The advantages of using Xamarin forms are still so huge that it really worth trying!
With the time and adoption of the environment, these pitfalls will of course be gradually solved (at least that is what we hopeJ).
Anyway, here, I will try to list some solutions for common pitfalls I encountered when I started with Xamarin using Visual Studio (and, sometimes, Xamarin Studio). I hope my solutions for these pitfalls will soon become obsolete (the sooner, the better!). I promise then to keep them online just for History!
IDE choice: Visual Studio + Xamarin Studio…
Your IDE choice is either Xamarin Studio and/or Visual Studio (through a plug-in).
Xamarin Studio performs nicely and its xaml Intellisense (which often works!) helps avoid typo errors. At the same time it does not handle WinPhone projects. And, when run on Windows, it does not handle iOS projects neither!
In Visual Studio, with the xamarin plug-in, the project management scope is global: you manage all platform projects (the WinPhone project (of course!), Android and iOS (a connection to a Mac – with XCode installed – is required for iOS compilation))
Xamarin plug-in for Visual Studio is still a little immature. So, in Visual Studio, you may from time to time encounter issues with the Intellisense. Build action configuration does not also seem to be correctly handled by the Xamarin plug-in. We will see some solutions for these issues. Restarting Visual Studio sometime helps resolve some discrepanciesJ
It is often useful to use Xamarin Studio for some operations (build action when adding resources or xaml files is better handled than in VS plug-in)
I mainly use Visual Studio, and occasionally navigate to Xamarin Studio for some tasks. Many of the solutions mentioned here are specific to Visual Studio.
What is a Xamarin Forms solution (.sln)?

A XF solution is composed of two code areas:
- A common PCL (Portable Class Library) project
- A per-platform project which contains the specific platform objects, code, resources and configuration. And which references (uses) the PCL project objects, code and resources.
For a common XF solution (iMaps in the illustration), you will have:
- The PCL library project (iMaps.dll): code and resources shared by all platforms
- iMaps.iOS project: specific code, resources and configuration for iOS
- iMaps.Droid project: specific code, resources and configuration for Android
- iMaps.WinPhone project: specific code, resources and configuration for Windows Phone.
Each of these projects may, of course, reference other PCL or platform-specific libraries.
Xaml: where is the xaml design surface?
If you are new to XF, or are not posted yet: just relax, sit down, (have a beer if you can):
YOU DON'T HAVE an XAML DESIGN UI!
That is obviously a big missing link in Xamarin forms. Not only you are just abandoned to write xaml code without seeing its (potential) output, even your xaml typos get caught only at runtime (with a horrible app crash of course!)
Your options? Not so many:
You have Gorilla Player (promising and quickly evolving)… other approaches and efforts are also underway.
Gorilla allow you (at design time) to instantly preview your xaml content page (or content view) on a device or an emulator, and will catch your xaml errors and typos and tell you their exceptions details. It is also able to run simultaneously on Android and iOS (devices or emulators).
The application resources: the App.xaml and App.xaml.cs pitfall
It is quite useful to define a set of resources available for all objects in a project. Traditionally, in a WPF or Silverlight project, these resources are defined in App.xaml and used in other xaml files as StaticResources. If you create a WPF or Silverlight project, the project template creates two files: App.xaml and App.xaml.cs. The first is to contain the xaml resources, the second contains the application methods and properties.
When you create a new Xamarin Forms solution, your PCL project would have only an App.cs file but no App.xaml file.
To solve this:
- Close the solution (or at least unload the PCL project)
- Navigate to the PCL project folder
- Rename App.cs to App.xaml.cs
- Create a file and name it App.xaml. It should contain:
<?xml version="1.0" encoding="utf-8" ?>
<Application xmlns=http://xamarin.com/schemas/2014/forms
xmlns:x=http://schemas.microsoft.com/winfx/2009/xaml
x:Class="[YOUR NAMSPACE].App">
</Application>
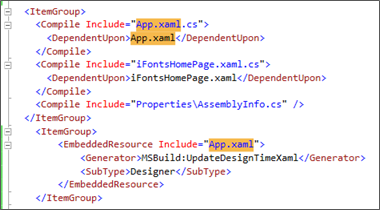
- Edit the project (.csproj) file (using Visual Studio or a text editor like Note Pad).
- Change this:
<Compile Include="App.cs" />
<Compile Include="App.xaml.cs">
<DependentUpon>App.xaml</DependentUpon>
</Compile>
- Add this ItemGroup section:
<ItemGroup>
<EmbeddedResource Include="App.xaml">
<Generator>MSBuild:UpdateDesignTimeXaml</Generator>
<SubType>Designer</SubType>
</EmbeddedResource>
</ItemGroup>

- Save the .csproj file
- Reload the project (or reopen the solution)
- Finally, in your App.xaml.cs file, you should first declare you class partial (in fact, another part is generated during compilation) the App constructor should call InitializeComponent() for your resources to be usable in other xaml files.
public partial App : Application
{
public App()
{
InitializeComponent() ;
- You can now define application resources in App.xaml and use them the same way in WPF and Silverlight apps.
Add new item: where is the ContentView (UserControl)?
ContentViews are an interesting xaml objects that are similar to UserControl in WPF/Silverlight. It allows you to define the presentation of one or more objects that you can include in other ContentPages, ListViews and other containers.
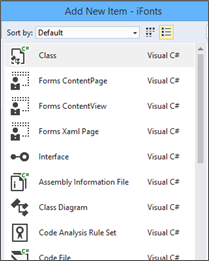
In Visual Studio, if you right click a project folder and select Add à New Item, you don't have a ContentView in the list of available items.

How to solve:
<ContentPage xmlns=http://xamarin.com/schemas/2014/forms
<ContentView xmlns=http://xamarin.com/schemas/2014/forms
- And, of course, this (end of file) </ContentPage> to this </ContentView>
- Open the .cs file of this new item
- Change this
public partial class NewContentView1 : ContentPage
public partial class NewContentView1 : ContentView
This can also be done by copy / paste files and changing class names…
Craftsmanship: software is J
Files and build action pitfalls
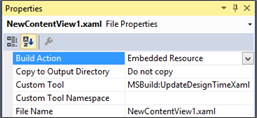
When you add an existent xaml file to your project, it sometime just breaks the project build with many weird errors. The cause is often that the xaml file has been assigned a wrong Build action.
You should check that xaml files are assigned Build Action = Embedded Resource, Do not copy, with Custom tool = MSBuild:UpdateDesignTimeXaml.

- Android assets: should be configured with Build Action = AndroidAsset, No copy (unless copy is needed)
- Android Resources (& drawables): Build Action = AndroidResource, No copy (unless copy is needed)
- iOS resources: Build Action = BundleResource, No copy (unless copy is needed)
- WinPhone assets: Build Action = Content, No copy (unless copy is needed)
- WinPhone resources: Build Action = Embedded Resource, No copy (unless copy is needed)
Don't use custom renderers unless…
One important feature of Xamarin forms is, obviously, to bring your forms to devices' screens. That is done by built-in 'renderers' whose role is to translate the (xamarin) xaml elements attributes to their equivalent in each platform (droid, iphone, win phone…). This translation process is not yet as perfect as we may expect. It is getting better with the progress of xamarin forms versions but, still, not yet perfect.
That sometimes produces discrepancies of graphical design between platforms (control dimensions, alignments, colors… etc.)
Fortunately, Xamarin forms provides the OnPlatform object (xaml markup extension) that allows us to specify per-platform specific values for elements and styles' attributes. And we may also use the Device static class to access information about the current platform on which your application is running and set values accordingly.
Using OnPlatform, for instance, you may define button height on per-platform value:
<OnPlatform x:TypeArguments="x:Double" x:Key="normalButtonHeight"
Android="44"
iOS="44"
WinPhone="78"/>
Then use it in a Button style:
<Style TargetType="Button">
<Setter Property="HeightRequest" Value="{StaticResource normalButtonHeight}" />
</Style>
This can also be achieved by different other methods. For instance:
- Use the Device static class (in the PCL project) to detect and set values according to the current platform on which your application is running
- Define specific resources (styles / templates…) in the target platform project
- And, ultimately, you may use a 'custom renderer' (in the target platform project), to handle the graphical attributes of your UI element before it is put on screen.
The advantage of handling things in the PCL project are obvious (Write Once, Run EverywhereJ)… There are situations where this can be impossible or undesirable. In that case specific platform code or resources can be used.
With custom renderers, things are a little different though.
Xamarin framework has a set of built-in renderers for all UI elements. These renderers are evolving relatively quickly (for the better!). When you define your own custom renderer, you in fact derive yours from one existing built-in renderer and will override some of its methods. That puts a new test/maintenance hassle on your project… and, with the evolution of built-in renderers, yours may end up by performing less effectively than the built-in one… (But will still override its features).
So: think twice before going for a custom renderer!
(More tips and pitfall solutions to follow…!)