Solutions to avoid some pitfalls for starting up with Xamarin forms maps package.
Before to use?
Some steps are required for your map application to be able to start and to display maps.
In Android project, before to use maps, you must first generate an API key. This can be done in your google account (create one if needed). You can optionally in this step link your API key to a specific application. This API key should be specified in the AndroidManifest.xml of your Android project:
<application android:label="Your app name" android:icon="@drawable/your icon">
    <meta-data android:name="com.google.android.geo.API_KEY"
            android:value="put you api ur key" />
<meta-data android:name="com.google.android.gms.version"
        android:value="@integer/google_play_services_version" />
</application>
In this same file, you should also specify the required location access permissions:

For iOS, you should specify the some values for the following keys in info.plist file:
<key>NSLocationAlwaysUsageDescription</key>
<string>Please allow us to use your location.</string>
<key>NSLocationWhenInUseUsageDescription</key>
<string>We are using your location</string>
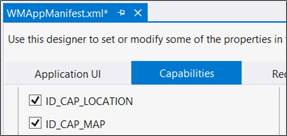
For WinPhone, you should specify some application capabilities as (at least):

For All platforms:
In each platform, call Xamarin.FormsMaps.Init(); after Xamarin.Forms.Forms.Init()
Without this call, your map will not show!
- iOS - AppDelegate.cs file, in the FinishedLaunching method.
- Android - MainActivity.cs file, in the OnCreate method.
- Win Phone - MainPage.xaml.cs file, in the MainPage constructor.
That is what the Xamarin Forms Maps documentation saysJ. In fact I tested: that is required for iOS, not required for Android… and for Win Phone… just a minute… the emulator is starting up… IT IS required!
How to use?… Look at it working
To use these items, you simply insert a Map View in your Xaml page (or ContentView). Which can also be done in code. In xaml, don't forget to mention the namespace!
Here is an example of a ContentView (a UserControl for our WPF/Silverlight friends!)
<?xml version="1.0" encoding="UTF-8"?>
<ContentView    x:Class="iMaps.iMapCtrl1"
    xmlns="http://xamarin.com/schemas/2014/forms"
    xmlns:x="http://schemas.microsoft.com/winfx/2009/xaml"
    xmlns:map="clr-namespace:Xamarin.Forms.Maps;assembly=Xamarin.Forms.Maps"
    >
    <map:Map x:Name="theMap" />
</ContentView>
|
Important remark: for a mysterious reason (you will see many in Xamarin environment), if the 'map' namespace specifies the assembly's extension ('.dll') that doesn't work in WinPhone (i.e. app crash!)
Should write this:
xmlns:map="clr-namespace:Xamarin.Forms.Maps;assembly=Xamarin.Forms.Maps"
Not this (results in WinPhone crash):
xmlns:map="clr-namespace:Xamarin.Forms.Maps;assembly=Xamarin.Forms.Maps.dll"
|
Now, for this sample, we can insert some Pins at the ContentView (UserControl) creation:
public iMapCtrl1()
{
    InitializeComponent();
    PutSomePinsOnMap();
}
void PutSomePinsOnMap()
{
    // define a center point and some sample pins
    Position        tourEiffel    = new Position(48.859217, 2.293914);
    Pin[]        pins            =
    {
        new Pin() {  Label = "Tour Eiffel",
            Position = new Position(48.858234, 2.293774), Type = PinType.Place },
        new Pin() {  Label = "Concorde",
            Position = new Position(48.865475, 2.321142), Type = PinType.Place },
        new Pin() {  Label = "Étoile",
            Position = new Position(48.873880, 2.295101), Type = PinType.Place },
        new Pin() {  Label = "La Défense",
            Position = new Position(48.892418, 2.236180), Type = PinType.Place },
    };

    foreach(Pin p in pins)
    {
        theMap.Pins.Add(p);
    }

    // center the map on Tour Eiffel / set the zoom level
    theMap.MoveToRegion(MapSpan.FromCenterAndRadius(tourEiffel, Distance.FromKilometers(2.5)));
}
Once this ContentView in a Page that gives a nice view like this: