Taoffi's blog

prisonniers du temps

Xamarin forms: elementary – don’t cast!


Many Xamarin users come from the Java environment and are starting with c#.

For those who don't know yet: please don't cast. Use the as operator instead.

Example:
In many situations, your method may seem like this:

void testcast(object img)
{
    Label    label1    = img as Label;    // label1 will simply be null
    Label    label2    = (Label)img;        // you get an InvalidCastException
}


Xamarin forms: a small step for mankind (!), an inside look - I

That is a second post in my series about Xamarin.

My intention is to write about various aspects of Xamarin environment, objects, architectural approaches as well as some recipes concluded by the lessons learnt through a year of intensive work in this platform.


For those who don't know about Xamarin and the Xamarin Forms offer, you may have a look at the (interesting) tale of this true modern adventure… with all the modern panoply of social experience, including unemployment and layoffs!

For a quick summary about Xamarin Forms (which is the ultimate evolution of Xamarin's offer):

Xamarin.Forms

Introduced in Xamarin 3 on May 28, 2014 and allows one to use portable controls subsets that are mapped to native controls of Android, iOS and Windows Phone.

In this post, I will try to explore important objects and mechanisms exposed in various libraries of the product. Knowledge of those is useful and may help for better understanding and usage.

Note: to explore these items, I used Visual Studio Object Browser along with Code map.

Who / What is inside?

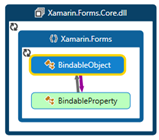
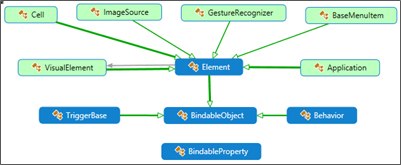
At the root of Xamarin.Forms, two foundation objects: The BindableProperty and BindableObject.

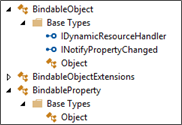
The BindableObject (abstract class… we will see some of its genealogy later) exposes:

  • BindingContext which is simply an object
  • BindingContextProperty: a Bindable property (bounces back to the BindingContext)
  • And several events: BindingContextChanged, PropertyChanged and PropertyChanging.


The BindableProperty (a sealed class), exposes the following read-only properties (initialized, naturally, by several public constructors):

  • DecalringType: System.Type
  • DefaultBindingMode: BindingMode enumeration
  • DefaultValue: object
  • IsReadOnly: bool
  • PropertyName: string
  • and ReturnType: System.Type


Yes, with such an object, you are ready to sail far Overseas!


BindableObject and BindableProperty relationship

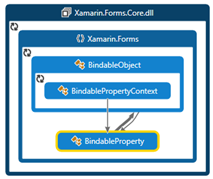
As we may expect, BindableObject makes (many) calls to BindableProperty (presumably through its BindablePropertyContext). That is a long subject that merits a specific post later. For now, let us have a look at the call mesh in the following illustration:

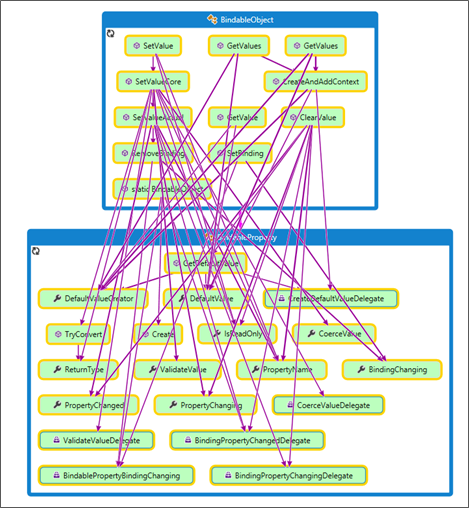
Exploring Xamarin Forms objects' genealogy

Who derives from BindableObject?

BindabelObject is the base class for WebViewSource à TriggerBase à Behavior à ColumnDefinition à RowDefinition à TableSectionView (what is this?J) à AND the Element!

The Element (abstract class) is the base class for à Application (!) à VisualElement (which is itself the parent of View… see below) à ImageSource (I now better understand my issues with thisJ) à GestureRecognizer à BaseMenuItem


Some debatable architectural aspects seem worthy for a note:

  • The Element is the base class of VisualElement.
  • In the same time, it exposes a member (ParentView) which is a VisualEement!


I remember, I was threatened to be fired for having used such relationshipJ. That is to say I am not fundamentally against… but let us admit that such relationship may – at least – restrain the evolution of both the parent and derived objects.

  • As you see in the figure, the ImageSource object derives from Element.
  • The Image (deriving from à View, itself deriving from à VisualElement, itself deriving from à Element)… has a member 'Source' which is an Element!

I think, at this point, I would have been definitely fired if I did something like thatJ.

But why not! It only becomes just a more risky game!

The VisualElement carrefour!

VisualElement object exposes properties needed for on-screen rendering: AnchorX / Y, BackgroundColor, Bounds, Height (get) / HeightRequest, Width (get) / WidthRequest / Minimum H/W Request, Opacity, Style, Rotation… etc. It also implements Interfaces that compose the infrastructure needed for rendering the object on each platform through the platform VisualElementRenderer<T> (where T: VisualElement).


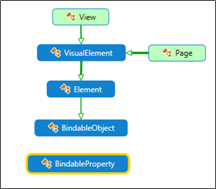
The VisualElement is the base class for two objects à Page and the View.

To avoid terminology confusions (Both View and Page are translated (rendered), in Win Phone, as a Panel (Which is a FrameworkElement)), the ViewContent (derives from View) is, approximately, what is called 'UserControl' in the Windows world. A ContentPage (derives from Page), with the same relative approximation, is what we call a Window.

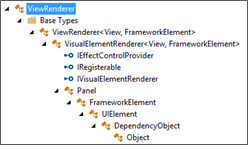
To better resolve (and understand) such objects associations between Xamarin core library and a specific platform, you may use Visual Studio Objet Browser (or other assembly browser) to have a look at the renderer of the Xamarin object for the platform.

The following illustrates, for instance, the View renderer object tree for the Win Phone platform.

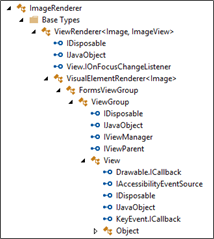
Here, it is the Image renderer on Android platform

The Page object

The page is the root object of several Types: à The ContentPage, à the NavigationPage, à the MultiPage<T> and the MatserPage.

I personally expected the Page to be a container (of Views) and that the Content property is one of the Page Object… that is not the case (deceiving ignoranceJ).


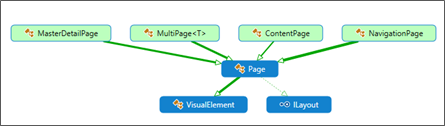
  • It is the ContentPage which exposes the Content property.
  • The NavigationPage exposes the (get/set) CurrentPage member property (which is a Page… so if you would like to get its 'Content', you will have to cast it to a 'ContentPage' with the risks implied in such a cast (life is dangerous!)
  • With the MultiPage<T> (where T: Page) you again have a (get/set) CurrentPage property that returns a T (of Type Page)… you now know how to access something useful inside!
  • The MasterDetail, as you may expect, exposes a Master and Detail (each of Type Page)


The View object

The View is the base class of à mostly all controls and layout root classes


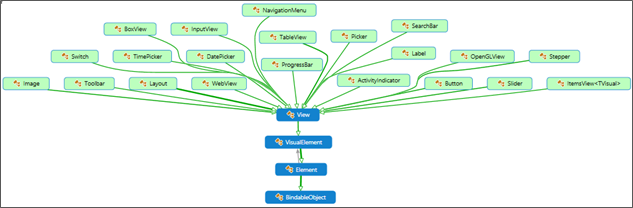
The View in everyday life

When you write <Button> in xaml (or when you write new Button(); in code), you are creating an object deriving from the View object. At runtime, your Button will be handed over to the Xamarin rendering engine to put the button on the target device's screen according to values you specified for properties of that object.


Note:

Not all properties are correctly transmitted or rendered on target devices (at least in the current version of Xamarin.Forms). In fact, for our Button example, some properties are not suitably tailored for all target platforms. For instance, the BorderRadius property of a Xamarin Button is not translated into anything on Win Phone.
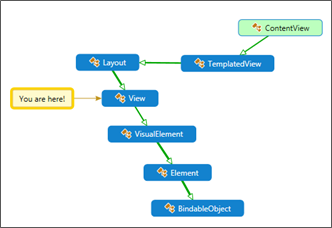
 

The ContentView

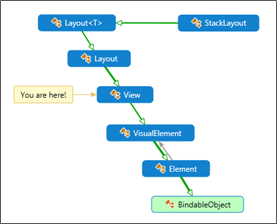
The StackLayout example

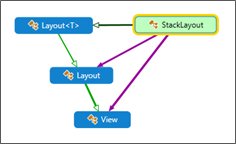
Let us take another container control deriving from the View object: the (famous) StackLayout.

StackLayout derives from ß Layout<T>. (It is a Layout<View>).


What Xamarin documentation says about StackLayout:

Summary:

A Xamarin.Forms.Layout`1 that positions child elements in a single line which can be oriented vertically or horizontally.

Remarks:

Because StackLayout layouts override the bounds on their child elements, application developers should not set bounds on them.


It exposes two properties (Both are bindable):

  • Orientation (StackOrientation enumeration: Horizontal / Vertical)
  • Spacing (double): the spacing between the layout elements.


Inherited properties

  • It inherits the Children (an IList<View>) property from its base class ß Layout<T> itself implementing the IViewContainer<View> Interface.
  • Padding (Thickness), inherited from Layout
  • IsClippedToBounds (bool), inherited from ß Layout: does the container clip its children to its own bounds (see documentation remark above)
  • HorizontalOptions, VerticalOptions (LayoutOptions) and GestureRecognizers (IList<GestureRecognizer>) are inherited from ß View.
  • Deeper in the genealogy, StackLayout inherits properties of the VisualElement
    • Then from Element
      • And finally from the BindableObject (the foundation object)


So, when we are using a StackLayout, we are using an IViewContainer, a Layout, a VisualElement, an Element and, ultimately, using a BindableObject.

And it is often important to remember this in order to make the most effective use of an object.

The Image example

As I mentioned above, Image is another useful example. I got confused while trying to manipulate its ImageSource property.

As the name suggests, I thought that ImageSource is a 'VisualElement'… It IS NOT J. It is an Element. It has several Load methods (from File, from Stream, from Uri…) and one (get only) CancellationTokeSource property… which is described in Xamarin documentation as: Used by inheritors to implement cancellable loads). Oddly enough, none of the derived classes delivered by Xamarin (FileImageSource, UriImageSource…) make use of this Cancellation token!

Being an Element (and thus, a BindableObject), ImageSource has few properties that you can set in a PCL project (xaml / code). That maybe one of the reasons why many questions about this object are on Xamarin developers forums!

That also makes of ImageSource a good recipe area that we will explore in a later post.


In a next post, I will explore the road it takes from your xaml (or shared code) to device screen… a long journey!

Xamarin forms: a small step for mankind!

My friends at UXDivers are doing a great job in bringing Xamarin Forms into the developer's desktop with nicely crafted design and some extra facilities like their Gorilla player which allows you to instantly view your xaml output at design-time.

UXDivers' Grial U.KIT also exposes a wide range of controls and design ideas that enriches applications with ready-made and adaptable Xamarin Forms elements.

Handling fonts with Xamarin Forms

One of the interesting features of Grial is using awesome web font to create attractive buttons design with a minimal resource cost.

As fonts seem to be one interesting resource for applications and, in the same time, are handled differently in target platforms (Android, iOS and Win Phone), I did a small dive into the subject.

My conclusions so far are quite simple:

  • To use a font, in Xamarin Forms solution, you should first get its definition file (preferably a .ttf)
  • According to the platform specific project, you should place that file:
    • For Android project: in the Assets folder. Build action = AndroidAsset (no copy)
    • For iOS project: in the Resources folder. Build action = Bundled resource (no copy). The name of the font file should also be included in the application's info.plist file. Example:

      <key>UIAppFonts</key>
          <array>
              <string>Novecentowide-Bold.ttf</string>
          </array>
       

    • For Window Phone project: in the Assets folder (or sub folder of it). Build action = Content (no copy)
  • For Android: you need a custom renderer in order to apply the selected font
  • For iOS and WP: the font family name is all what you need to apply the font


Styles and Font family naming

As font family naming conventions vary for each platform, the ideal way is to use the Xamarin Forms OnPlatform to define this.

In this example we create an on platform string resource (in App.xaml) with the key "fontNovecentoName":


<OnPlatform x:TypeArguments="x:String"
    Android="Novecentowide-Bold.otf"
    iOS="Novecentowide-Bold"
    WinPhone="./Assets/Fonts/Novecentowide-Bold.otf#Novecento"
    x:Key="fontNovecentoName"/>

 We can then refer to this font family name in a Label style, like in the following:


<Style TargetType="Label" x:Key="labelNovecento">
    <Setter Property="FontFamily"    Value="{StaticResource fontNovecentoName}" />
    <Setter Property="FontSize"        Value="16" />
</Style>


Once we defined this style as an application resource, we can use it anywhere in our xaml views to create labels using the font:

<Label Style="{StaticResource labelNovecento}" Text="This should show Novencento font" />


That label will directly show on iOS and Windows Phone with no extra work.

For Android, we should use a 'Custom renderer' (deriving from Xamarin.Forms LabelRenderer) whose role is to extract the font family name from the xaml code and try to apply it to the target label.


Android custom renderer

'Custom renderers' is a vast subject. To summarize: the role of a custom renderer is to do the job of translating xaml instructions into on-screen graphical items according to each platform constraints. There is a Xamarin built-in renderer for each type of Xamarin Forms controls (Views). If you need an extra rendering job for a control, you create your own renderer inheriting the built-in one for the control… and you override one or more of that built-in renderer's methods to add your specific functionality.


For our subject, we need to create a custom Label renderer in Android to apply the desired font if any is specified.

Sample code:


// we should export our renderer in order to be called
[assembly: ExportRenderer (typeof (Label), typeof (iFontLabelRenderer_Android))]

namespace iFonts.Droid
{
   public class iFontLabelRenderer_Android : LabelRenderer
   {
     // override the base’s OnElementChanged
     protected override void OnElementChanged (ElementChangedEventArgs<Label> e)
     {
        base.OnElementChanged (e);

        var label      = Control as TextView;
        var  xfControl  = Element as Label;

        // try to find the font family name
        string     fontName= xfControl == null ? null : xfControl.FontFamily;

        if(string.IsNullOrEmpty(fontName))
           return;

        try
        {
           // try to create and apply the font
           Typeface font = Typeface.CreateFromAsset (Forms.Context.Assets, fontName);
           label.Typeface = font;
        }
        catch (Exception)
        {
           // throw exception if you find this useful
           //throw;
        }
     }
   }
}


Download the sample app. iFonts.zip (944.41 kb)

TFS thoughts – Task Closed on code check-in issue

The problem

You probably experienced this some time:

  • You have a task assigned to you
  • It is in active state
  • You check-in your code
  • The task is automatically marked as Closed


This workflow may seem OK in some context. However, judging by the number of complaints I read on many development sites, that behavior seems more of an annoyance than a comfort!

In my own view, a task should actually be intentionally closed as long as it has been assigned to a human being. Otherwise, if the task had been assigned to a robot, things may be considered differently!

In 2010, someone at Microsoft's TFS team mentioned:

… people have asked me how to modify the Scrum template such that a Task or Bug is marked as Done during a check-in. We left this out of the original state flow because we wanted the done state transition to be very intentional


The TFS team seem to have succumbed to the robotic behavior since!

The solution

In face of such issue, everyone finds a solution but few talk about it (so many other troubles out thereJ)

To solve this annoying behavior, some people propose to go through some acrobatic solutions in the registry and the like. Which is tedious and remains unsustainable in a professional development environment.

Rationally speaking, in its workflow, a Task transits between its different states. For instance: from 'Active' to 'In progress' to 'Closed'. These transitions can be automated by calling some method somewhere in the assemblies that run TFS. And that seems exactly what happens here.

To put this 'automation' OFF, let us look at the article referenced above, to see how the TFS team put this ON:

… Below is a snippet of the In Progress –> Done transition on the Task work item after applying the changes.


<TRANSITION from="In Progress" to="Done">

<ACTIONS>

<ACTION value="Microsoft.VSTS.Actions.Checkin" />

</ACTIONS>

<REASONS>

<DEFAULTREASON value="Work finished" />

</REASONS>

</TRANSITION>


Yes, it is there… we can simply remove this to put this option OFF!

But… where to find this?

This is part of the 'process template' that compose the TFS meta-models which in turn define the structures, behaviors and processing workflows of TFS objects (among which lives the 'Task' work item).

Using Team foundation server 201X power tools (replace the X by you TFS version: 0, 2 or 3)

  • In Visual Studio, select Tools, Process Editor, WorkItem Types, Open WIT from server
  • Select the Task Work item


  • The Workflow tab displays the current processing workflow
  • Right click the Transition Active to Closed and select Open Details


  • On the details dialog, select the Actions Tab
  • Delete the Check-in action

  •  Save the work item type


Note: Of course, you can do this the hard way by downloading the process template files, and diving into XML… etc. … it is up to you… I personally prefer not J

Deep Zoom follow-up - optimizing displayed (KML) polygon points

DeepZoom has been one of the most inspiring projects/technologies in last years. Its approach is now extensively used in various domains, notably in mapping applications.

I think DeepZoom approach still have more application areas to explore.

In this article, I will explore one question where the DeepZoom approach can be quite useful.

KML Polygons

KML (Keyhole Markup Language) is an XML-notation-based 'language' now widely used to describe geographic data. Among many types of data, KML includes Polygons, which describe point locations on a map. A polygon may, for instance describe the contour of political frontiers of a country or a seashore…, which may thus contain a large number of point-coordinates.

As each of the polygon's points may be associated with more or less large data objects, processing the polygon information may become a challenging operation either on a server or on a client machine. Reducing manipulated polygon data size and required processing efforts is thus an important performance question.

One of the techniques often used is to compress (zip) the KML transmitted files' data (to produce .kmz files instead of .kml). But there should be a better approach in simply transferring (or processing) only significant point's data.


Zoom level and view port

When we view or display a map, we in fact view in a zoom level. According to this zoom level, two points may have a significant distance or be confused into one same point.

The following figures illustrate this:

  • At the first zoom level, point 1 and point 2 are clearly distinct
  • The more we zoom-out, the less distinctive they become
  • Until both can be considered as one same point

Conclusion: according to the zoom-level, we may transfer (or manipulate/process) only one of those points instead of both.


Zoom level1

Zoom-out1

Zoom-out2


This can also be illustrated by the DeepZoom 'pyramid' approach:


A map is also viewed into a 'View Port' (the window through which we view the map).

For the two points of the previous example, at certain zoom-in level (or view port coordinates change), one (or both) of them may be located out of the view port.


Another conclusion: we don't need to transfer (or manipulate/process) polygon points which may be located outside of the current view port.

The delivered code sample

The downloadable code includes the data of a polygon composed of a large array of points.

The sample uses several parameters to determine which points to be considered for transfer or processing:

  • The view port coordinates: used to select only points inside the view port
  • The zoom level: associated with a ratio used to compare the significance of points' coordinates variations


The ZoomPortView object exposes few properties: a Name, a ZoomRatio, TopLeft and BottomRight points (Width and Height are calculated according to those points' coordinates).


The ZoomPolygon object exposes few properties: a list of polygon's Points. For the sake of current demonstration, the object also exposes PointsOutOfPortView which is a list of points that are out of the current port view.

ZoomPolygon class offers a static method which parses an array of points according to a given port view, returning the related new ZoomPolygon object.


public static ZoomPolygon Parse(Point[] points, ZoomPortView portView)
{
    ZoomPolygon        polygon        = new ZoomPolygon(portView);
    ObservableCollection<Point> pointList = new ObservableCollection<Point>();
    ObservableCollection<Point> pointsOutPortView = new ObservableCollection<Point>();
    double    zoomRatio = portView.ZoomRatio;
 
    double maxX    = portView.Width,
            maxY    = portView.Height;
    Point    point,
            last    = new Point();
 
    for(int index = 0; index< points.Length; index++)
    {
        point = points[index];
 
        if( ! portView.IsPointInPortview(point))
        {
            pointsOutPortView.Add(point);
            goto next_point;
        }
 
        if (pointList.Count <= 0)
        {
            pointList.Add(point);
            goto next_point;
        }
 
        if( Math.Abs( (point.X - last.X) / maxX) >= zoomRatio
            || Math.Abs( (point.Y - last.Y) / maxY) >= zoomRatio)
            pointList.Add(point);
next_point:
        last = point;
    }
 
    polygon.Points = pointList;
    polygon.PointsOutOfPortView = pointsOutPortView;
    return polygon;
}


Note: the code above can of course be more compact using Linq. This version seems more illustrative of the logic to include / exclude polygon points.


Sample screen shots


Download the sample code

KmlOptimizerSample.zip (1.28 mb)

Acknowledgement

Thanks to all my friends at Thomson Reuters' iMap Project with whom I learnt much about kml and maps in general: Benoît, Florent, Catalin, Christophe, Ronan, John, Geffe, Calum…

Inspiring Jargon

I read:

"Arianespace… announced […] that two satellites it had tried to launch to join the European Space Agency's Galileo constellation, had entered a "non-nominal injection orbit"—in other words, gone wrong"  

You probably now know how to better say "I got a bug" (when it is just a "non-nominal behavior")!

Choices in a logical tree view – WPF sample

Using check boxes in TreeView control is a handy way for presenting choices in their logical tree-like structure.

In real life, though, choices can be a mix of inclusive (check-box) and exclusive (radio-button) options.

I expose here a solution for using that mix of option types in one same tree view.

The problem

The problem is divided into three main subjects:

  • How to use a mix of checkbox / radio button nodes in the same tree view control
  • How to get a radio button to be toggled from checked to unchecked status: Checkboxes are, 'naturally', able to be toggled from checked to unchecked status. This is not the case for Radio buttons. The result is that when you use radio button in a tree view, you will be able to check it but not to get it uncheck!
  • How to handle exclusive choices selection. That is when an exclusive option gets selected (checked), for instance,we must unselect all other exclusive sibling options.


To solve the first question, we will use:

  • A tree node object which indicates its option type (exclusive / inclusive)
  • Hierarchical control templates for each choice type
  • A template selector which will select the correct template according to the node object choice type


To solve the second, we will simply create a new Toggled Radio Button (which derives from RadioButton) and get this new object handle the Click event to toggle its selection status.


public class RadioToggleButton : RadioButton
{
    protected override void OnClick()
    {
        IsChecked = !IsChecked;
    }
}


The third question will be solved by implementing the required behaviors within our special tree node object.


The TreeNode object

The TreeNode object exposes few properties:

  • A Title
  • A Parent node (TreeNode)
  • A list of Children (List of TreeNode items)
  • A boolean flag which indicates if the node represents an exclusive choice option
  • A boolean flag which indicates if the node is selected

Through these properties, TreeNode object can expose other properties like its Root node, the First exclusive parent or descendant… etc.


The TreeNode Hierarchical data template


<UserControl.Resources>
…
…
    <!-- hierarchical template for checkbox treeview items -->
    <HierarchicalDataTemplate x:Key="checkBoxTemplate" 
        DataType="{x:Type app:TreeNode}"
        ItemsSource="{Binding Children}">
        <StackPanel Orientation="Horizontal">
            <CheckBox Focusable="False"
                VerticalAlignment="Center"
                IsChecked="{Binding IsSelected, Mode=TwoWay}" />
            <TextBlock Text="{Binding Title}" />
        </StackPanel>
    </HierarchicalDataTemplate>
 
    <!-- hierarchical template for (toggled) radio buttons treeview items -->
    <HierarchicalDataTemplate x:Key="radioButtonTemplate" 
            DataType="{x:Type app:TreeNode}"
            ItemsSource="{Binding Children}">
        <StackPanel Orientation="Horizontal">
            <ctrl:RadioToggleButton Focusable="False"
            VerticalAlignment="Center"
            IsChecked="{Binding IsSelected, Mode=TwoWay}" />
            <TextBlock Text="{Binding Title}" Margin="4, 1, 0, 0" />
        </StackPanel>
    </HierarchicalDataTemplate>
</UserControl.Resources>


The TreeView node's Item template selector


public class TreeNodeXTemplateSelector : DataTemplateSelector
{
    public override DataTemplate SelectTemplate(
                object item, DependencyObject container)
    {
        FrameworkElement    element = container    as FrameworkElement;
        TreeNode    node    = item  as TreeNode;
 
        if (element != null && node != null)
        {
            if (node.IsExclusive)
                return element.FindResource("radioButtonTemplate")
                                 as HierarchicalDataTemplate;
            return element.FindResource("checkBoxTemplate")
                                as HierarchicalDataTemplate;
        }
        return null;
    }
}


We can now use an ItemTemplateSelector to tell the Tree view control to select the adequate data template for each item according the tree node choice selection type (exclusive / inclusive)


<UserControl.Resources>
    <app:TreeNodeXTemplateSelector	x:Key="templateSelector" />
    …
    …
</UserControl.Resources>


<TreeView x:Name="treeview1" ItemsSource="{Binding Root.Children}"
                  ItemTemplateSelector="{StaticResource templateSelector}"/>


Exclusive node selection behavior

TreeNode selection behavior can be summarized as follows:

  • If the node is inclusive: do nothing (just set the selected flag)
  • If the node is exclusive (and selected):
    • Unselect all exclusive siblings (siblings = Parent's Children)
    • Select all inclusive child nodes
    • Select the first exclusive child node if any


public void UpdateSelection()
{
    if(! _isExclusive)
        return;
 
    if(_isSelected == true)
    {
        UnSelectSiblings();
    }
 
    SelectChildren(_isSelected);
}


protected void SelectChildren(bool selected)
{
    if(! selected)
    {
        UnSelectChildren();
        return;
    }
 
    TreeNode firstEx = FirstExclusiveChild;
 
    if(firstEx != null)
        firstEx.IsSelected = selected;
 
    foreach(TreeNode node in _children)
    {
        if(node.IsExclusive)
            continue;
 
        node.SetSelection(value: selected, updateChildren: true);
    }
}


Sample screenshot


Download the sample code TreeViewRadioAndCheckButtons.zip (67.88 kb)

Microsoft case: going monochrome

On the Windows Phone 8, the latest MSFT phone OS, you have a nice Theme selection option, which says:

"Change your phone's background and accent color to suit your mood today, this week or all month"

Quite attractive!

The feature proposes two settings:

  • Background
  • Accent color


On 'Background', you have two options: Light / Dark

On 'Accent color', you have a palette of 21 colors (which seems to be a pretty little choice on a device that, according to the manufacturer, can display 65000 colors or more!)

I should admit, that not having a choice is in a way less time consuming. May be this was the initial OS designer's intended objective.


Now let us leave WP and go back to the desktop machine to have a look at Microsoft Office 2013.

Here too, you have a nice feature to select your theme.

You have the choice between:

  • White
  • Light gray
  • Dark grey


The difference between the three is really too subtle:

I tried them all, and ended up by selecting 'Dark': a little more readable!

On another point: after all the literature about the 'user interface design guidelines', it now seems that Microsoft Office apps are the only applications that can keep being outside of any graphical constraints. Those guys are really too spoiledJ


Conclusion

It seems that someone at MSFT has decided to re-form our education about colors. The 'monochrome' seems to be the new MSFT User Interface Strategy (you can check yourself: Windows Phone, Windows 8, Office 2013…)

Some people may find this abusive… but, in a way, we are much less embarrassed with this new reduced theme strategy… we may gain more time to think about things more useful!

Of recipes and methods – Agile and agile rituals

Let me first clarify:

Learning that the square root of 144 = 12 is a 'recipe'.

Learning how to retrieve the square root of a number is a 'method'.

Recipes represent one application of a method in a specific context.

They are efficient and straightforward, gratifying, easier to retain and easier to sell !

Still they most likely apply to a context and can hardly be useful if elements of the context change.

Methods are less easy to retain and assimilate. They also often need to be ascertained through applications in various contexts before being accepted.

The bad thing with recipes is that they are sealed, and tend sometimes to occult the openness of their originating method.

One good demonstrative example of this is the Agile principles (method) vs. the multitude of – more or less ridiculous – rituals (recipes) falsely attributed to the originating method.

Some of the rituals may have been correctly applied in specific contexts producing suitable results. But, no doubt, with different context, the same 'successful' rituals may be disastrous.

It is easier to retain rituals than to understand principles… even easier to retain those rituals that you may find attractive!